This is information about the enhanced version of RegExp Find and Replace add-on for MediaMonkey v2.x-4.x. The freely available version of this add-on is already one of the largest MediaMonkey's add-ons that is the most powerful and flexible for finding and replacing metadata about media files. However, the enhanced version is more than two times larger and it has added many very useful options; among others the batch execution of presets and better organization of presets.
- v6.0 - 2021-02-16
- Added: ability for the Choose/Tune RegExp Preset dialog boxes to be modeless when the corresponding option is turned on in the Options dialog box, which allows much easier and faster navigation and editing of presets;
- Added: ability to insert (load/import) presets at the selected row in the table in the Manage RegExp Presets dialog box, which allows much easier and faster movement of multiple presets in the list than using the Move Up/Down buttons that are still limited on a single preset; if no row is selected, the loaded/imported presets will be added to the end of list as it was only possible in the previous versions;
- Added: Save/Load buttons to the Manage RegExp Presets dialog box that behaves similarly to the Copy/Paste options by saving/loading presets to the intermediary .ini file;
- Added: ability to export/import masks from/to the opened .ini file in the Manage RegExp Presets dialog box, i.e. to export/import presets from one external .ini file to another;
- Added: combo box with options for sorting of presets in the Manage RegExp Presets and Choose RegExp Preset dialog boxes (previously only available in the context menu of the table);
- Added: temporary sorting of rows in the Manage/Choose dialog boxes without changing their order in the .ini file (you could click on the table header in the Manage dialog if you want to save presets with the chosen order as in the previous versions);
- Added: ability to check on/off multiple consequent rows at once in the Manage RegExp Presets and Preset Settings dialog boxes using the Shift key;
- Added: resizing/changing of the Next/Prev, Move Up/Down and Export/Import buttons in the Manage RegExp Presets dialog box when its size is horizontally reduced too much;
- Added: Last Executed Presets list with 10-levels deep history;
- Added: Favorite Presets list;
- Changed: caption of the Toolbar check box to Favorite in the Preset Settings dialog box; the presets with turned that option on will be displayed in the Favorite Presets list in menus and as the toolbar buttons/toolbar menu (depending on the next options in the Options dialog box);
- Replaced: the check box Show toolbar buttons for presets with enabled button in Find & Replace dialog box in the Options dialog box with the two options: Presets having the Favorite option turned on in the Preset Settings dialog box: Show as separate toolbar buttons / Show in Favorite Presets toolbar menu;
- Added: adjustment dialog boxes for batch presets that contain the dropdown lists for source/destination fields of individual contained presets;
- Added: ability to save preset with the same name in two or more menu groups;
- Added: separate Add button in the Preset Settings dialog box;
- Added: custom functions RegVal, RegPos, RegLen, SortArray and DatabaseField and <Eval> tag for adjustment (search for them in the list of presets to see how to use them);
- Added: options (F)/(R) decode, w/ <.>, w/o <.> for display of Find what/Replace with strings with decoded/replaced tags in info boxes;
- Added: ability to resize Find what/Replace with text boxes individually in the Preset Settings dialog when it is set to alternate view mode using the "^/_" button;
- Added: options in the table's context menu that determine which column(s) will be displayed in the table of Preset Settings dialog (Path or From Field, which is useful with the presets that modify both source and destination fields at once, e.g. many "Move..." presets);
- Fixed: saving of broken presets when a multi-line text is entered in the Preset Settings and Tune/Adjustment dialog boxes, e.g. for Comment and Lyrics fields;
- Fixed: resizing of fonts of many controls in dialog boxes, which are based on web browser control, depending on the Font size chosen in the Skin sheet of the Options dialog box;
- Fixed: resizing of dialog boxes and blank web browser controls in some events (after hibernation, switching system user/system color depth, changing skin) with the skinned version of the program on Windows Vista and later;
- Improved: look of the "...", Tune and "^/_" buttons in the Preset Settings dialog box;
- Improved: speed of many things (e.g. opening of dialog boxes, ...);
- Added/Improved: many presets.
- v5.2 - 2018-09-30
- Added: drop down Find list with the last 8 used terms in the Manage Presets/Choose dialog boxes;
- Fixed: very slow startup that is caused by Windows 10 Update and its Windows Defender Real-Time Protection;
- Fixed: many small things;
- Added/Improved: many presets.
- v5.1 - 2017-03-07
- Added: Add button to the Edit Preset dialog box which allows creating new presets based on existing ones from the Manage Presets dialog box;
- Renamed: OK button to Update/Rename in the Edit Preset dialog box;
- Added: ability to create groups with radio buttons in the adjustment dialog box using <Else Caption="..."> tag (the good news: groups could be nested, the bad news: groups could contain only two radio buttons);
- Improved: <If> tag used in adjustment dialog boxes;
- Fixed: Invert mode with VBScript (F) option;
- Fixed: update of the Date Modified property of file when changing the Timestamp field;
- Removed: many redundant presets to allow faster work, but many presets now have doubled function using the new groups with radio buttons; e.g. almost all "Copy..." presets could work as old "Assign..." or "Append..." presets;
- Improved: many presets.
- v5.0.3 - 2017-01-07
- Fixed: unneeded update of the timestamp when modifying non-tag fields (e.g. Added);
- Fixed: Delete emptied folders option after moving files, all empty parent folders are now removed (until now only empty folder that contained moved media file(s) was removed, but not its empty parent folders).
- v5.0.2 - 2016-04-21
- Fixed: typing numerical values on keyboard in SpinEdit controls on the adjustment and Preset Settings dialog boxes (functional only in MM v3.1.2.1289 or higher);
- Fixed: unnecessary display of dialog box on start-up asking if you want to install new presets after automatic adjustment of clock caused by switch in daylight saving time;
- Fixed: unneeded display of confirmation dialog box when renaming presets if the begin of the preset's name already exists;
- Fixed: Date and Original Date fields, now they display dates using ISO format and accept empty string for resetting the field;
- Fixed: display of source/destination field in the adjustment dialog box for renamed Custom fields;
- Fixed: Replace All button in the Preset Settings dialog box for presets that use bReplacing variable (mostly the presets that modify two fields at once);
- Added: ability to use ID tags between Find what and Replace with strings (e.g. in the updated "Capitalize with exceptions" preset);
- Added/Updated: many presets.
- v5.0.1 - 2016-02-21
- Fixed: toolbar buttons for batch presets;
- Fixed: update of hotkeys when that option of preset is modified;
- Fixed: graphical interface of some elements in the Preset Settings and Manage Presets dialog boxes for the unskinned version and unsupported skins;
- Added: a few presets.
- v5.0 - 2015-11-03
- Added: batch execution of presets which allows modification of two or more fields at once, with ability to create multiple batches for different tasks;
- Replaced: Tag Manipulation Presets menu with sub-menus for better organization, with ability to create new custom menus, so instead of one big menu with all presets you would get presets hierarchy on two menu levels;
- Added: Find option with the Next/Prev buttons to the Manage Presets's dialog box (improved old Export/Import dialog) which allows searching for preset that contains the specified text;
- Added: Match case and Regular expressions options for use with the mentioned Find option;
- Added: context menu to the table in the Manage Presets dialog box with some options usable in that dialog box (Copy, Select all, Print, Word Wrap, Match case, RegEx and several sorting options, e.g. Sort all presets by menu and name);
- Added: Add/Edit button to the Manage Presets dialog box;
- Added: ability to apply preset using menu, hotkey or toolbar and to open the Manage Presets dialog box while the Preset Settings dialog box is still opened (if the corresponding Modeless option is turned on in the Options dialog);
- Added: Choose RegExp Preset dialog box similar to the Manage Presets dialog for searching and selecting preset that is opening from the Preset Settings dialog box using the "..." button;
- Added: ability to specify which action would be applied (Replace all, Keep/Select matched/replaceable) when you start some preset using menu, hotkey or toolbar (until now it was only Replace all);
- Added: Keep/Select irreplaceable options;
- Added: ability to apply some preset to the currently playing file using menu, hotkey or toolbar (until now it could be applied only to the selected files);
- Added: Tune dialog box that is opening from the Preset Settings dialog for fine adjustment of preset parameters without messing with the long and complicated Find what/Replace with strings;
- Added: inverted mode when you could find something in one field and use matched string to replace data in another field (until now it was possible to replace data only in the same field that is also used to find data) (that option is experimental and maybe I will change it in the future);
- Added: test of VBScript conditions using Find what string in inverted mode;
- Improved: Description text box in Preset Settings dialog box and preset adjustment dialog boxes, which is now multi-line;
- Added: ability to enlarge Find what/Replace with text boxes with "^/_" buttons;
- Added: ability to choose what will be displayed in the info boxes below Find what/Replace with controls: Old <Into> (Original), Old <From> (Replacement), New <Into> (Result), New <From> (useful with presets that could modify two presets at once);
- Added: buttons/combo boxes with several new options (Entire/Empty/Filled/Begin/End and Field/<From>/<Into>/<Str.>/< Num.>, depending of the preset settings) that are between Find what/Into, and Replace with/From combo boxes, replacing Full buttons that was next to the Regular expression check boxes;
- Replaced: Backward search direction check box with the dropdown list next to the Find Next button containing the new Find Previous command;
- Replaced: |< and >| buttons with the additional spin buttons that are next to the text box showing the currently selected track;
- Added: ability to use <If>, <Else> and <End If> tags in Find what/Replace with strings for conditional modification of presets using check boxes in the preset adjustment dialog boxes (similar to the new Magic Nodes add-on);
- Added: ability to log information about modifications of metadata when applying presets using the Event Logger add-on;
- Added/Improved: many presets, there are now 500 supplied (but don't worry, they are all logically organized into sub-menus and relatively easy to find).
- For MediaMonkey 3.0 or higher - just double-click on the RegExpReplace-xx.mmip file; if you are on Vista or newer Windows and you got "Product installation error", make sure you have MM3 set to "Run as Administrator"; if you downloaded the installation package with IE7 and it changed its extension to a .zip, you should first change it back to a .mmip.
- For MediaMonkey 2.x - rename a .mmip extension to a .zip, extract RegExpReplace.vbs and RegExpReplace.ini files to the MediaMonkey's "Scripts\Auto" folder and restart MM program.
If you are upgrading this add-on from an old version, it is strongly recommended that you follow these steps:
1. make a backup of your own created presets using the Edit / RegExp Export/Import dialog box (pre-v4.4), or Edit / RegExp Find and Replace / Manage Presets dialog box (v4.4 or higher);
2. uninstall the old version of the add-on and choose Yes when you are asked if you want to remove add-on settings;
3. install the new version of the add-on;
4. import your own created presets using the Edit / RegExp Find and Replace / Manage Presets dialog box.
This way, you will always have the latest and updated presets correctly sorted. If you don't remove the old settings (together with presets), this add-on will check the names of presets during the installation and, if they are same as the old ones, they will be skipped or relocated.
Using this add-on is very similar to the older versions of the add-on with some additions. The RegExp Find and Replace add-on could be used by beginners as well as by very advanced users:
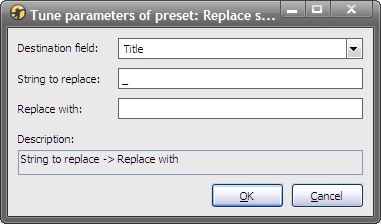
1. Beginners could use the add-on by just applying the presets from the menu. You could find 550+ predefined presets for different tasks that could be useful for you without any additional adjustment, e.g. you could clear field, copy conditionally full or part of one field to another, swap the first and the last name of Artist, ... However, many of these presets can be adjusted in a dialog box that contains one or more different controls depending on the tag(s) used in the selected preset. For example, with the preset "Replace specified string with another one in <Into Field>" you could set 3 parameters: Destination field, String to replace and Replace with.
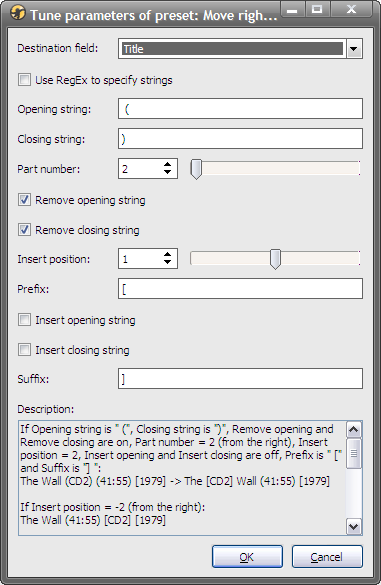
The presets could be very simple like the one just mentioned, but also very complex like the preset "Move right-specified part of <Into Field> between (and including) specified strings to +/- specified word position".
If you modify some parameter in the adjustment dialog box and confirm execution of the preset with the OK button, that modification will be remembered in the corresponding preset.
2. Somewhat more experienced users could create their own presets to do some frequent data manipulations that are different than those that are included with the add-on. You could use the Edit > RegExp Find and Replace > Preset Settings dialog box to find/replace data in files as you could do in any text editor, but you could also use the same dialog box to create/edit presets. Such presets could be applied from the mentioned dialog box, but they are also directly accessible using the corresponding menus, hotkeys and/or toolbar buttons.
The replacing presets started by menu/hotkey/toolbar will be applied to the files selected in the main filelist or Now playing panel, depending of that which panel is active. The new version of the add-on also has ability to show/select files using presets from menu/hotkey/toolbar, and in that case the presets will be applied on all files that are visible in the filelist or Now playing panel.
Menu
You could open the add-on's dialog boxes and apply its presets using the RegExp Find and Replace menu items located in the main Edit menu and popup menus of the main filelist and Now playing panel. You could also get the same menu if you click on the RegExp Tagging Presets toolbar button (light bulb) located on the Search toolbar [MM2-3] or RegExp Find and Replace toolbar [MM4] if the Show the toolbar button for the RegExp Tagging Presets menu option is turned on in the Options dialog box.
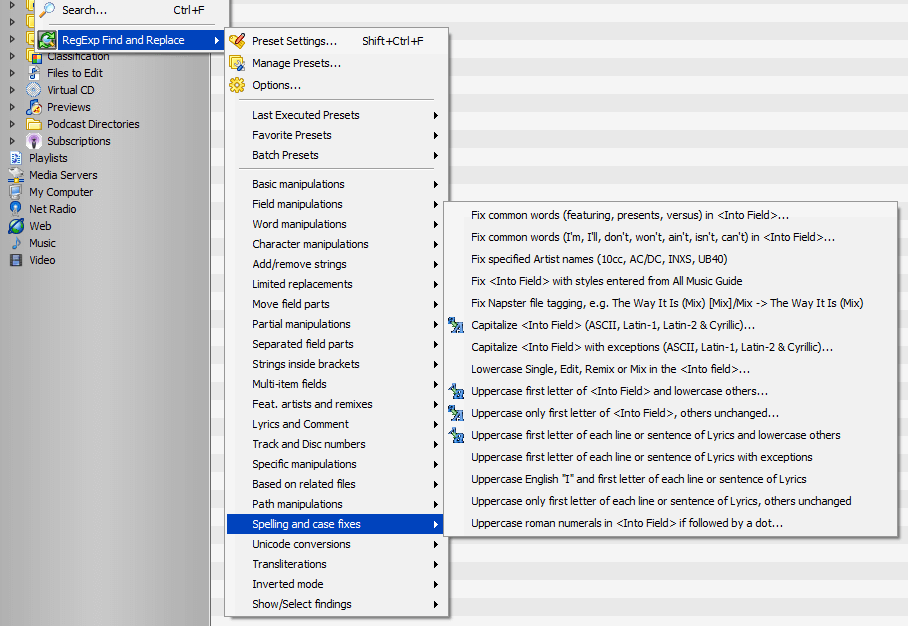
The following items are available in menus:
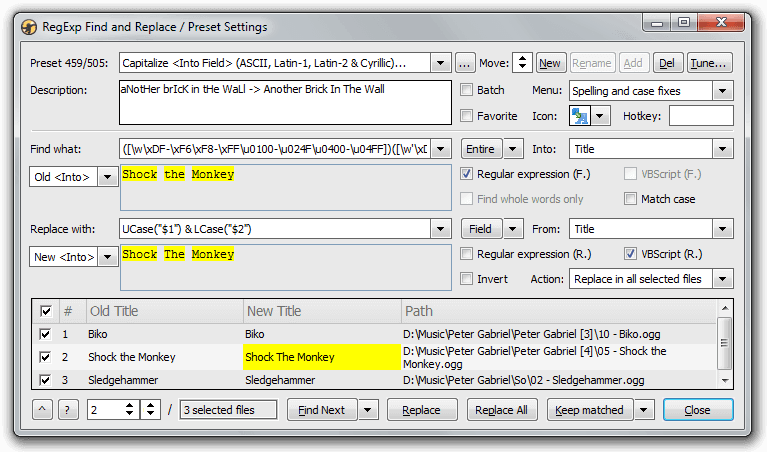
RegExp Find and Replace / Preset Settings
The Preset Settings dialog box allows finding/replacing metadata in files/database and creating/editing presets. This dialog box is resizable, so you could enlarge it, e.g. if you cannot see the content of some control.

Preset
The first group of controls, at the top of the Preset Settings dialog box, is mainly about settings how the selected preset is seen and accessed within the program (user interface). Firstly, we have the Preset label showing the number of the selected preset and total number of presets and next to it we have a combo box which contains a list of all stored presets. You could select some specific preset from that list and after that you could apply it to the selected files or you could modify its settings to suits your needs. That control also allows you to enter a name for the new or existing preset. It is possible to have two or more presets with the same name only if they belong to different menu groups (set with the Menu option).

... (Choose RegExp Preset)
Using the Preset combo box to search for a particular preset that you want to load could be very tedious task since that list could contain 500 or more items. That problem could be avoided using the "..." button that is located on the right side of the Preset combo box. If you click on it, you will get opened the Choose RegExp Preset dialog box that is similar to the Manage RegExp Presets dialog box containing the table with all available presets. You could find a preset in that table that contains the wanted text if you type it in the Find text box. All presets that contain the wanted text will have ticked check boxes on the left side of the table. You could jump to the next or previous preset that contains the specified text using the Next and Prev buttons. With the Match case and Regular expressions check boxes you could further refine the searching results.
If you have turned on the Modeless option in the Options dialog box, when you click on the row in the table, the corresponding preset will be immediately displayed in the Preset Settings dialog box. And vice versa, if you select a preset in the Preset combo box in the Preset Settings dialog box, the corresponding row will be selected in the Choose dialog box. However, if you have Modeless option turned off, after you select the wanted mask in the Choose dialog box, you need to confirm that using the OK button and that dialog will be closed.
Move, New, Update / Rename, Add, Delete
Next to the "..." button we have Move up/down buttons, which allow us to move a selected preset up or down in the list. Then we have 4 buttons for manipulation of presets: New, Rename/Update, Add and Del. The New button resets all controls in the dialog box to their initial (blank) states, which could be used when we want to create a new preset from scratch. The following button could be used if you want to save the currently selected preset and it has two alternate captions depending of the modifications made in the dialog:
1. Rename - if you change only the preset name and leave all other preset parameters unchanged;
2. Update - if you change any parameter (e.g. Description).
The Add button allows adding of the currently displayed preset to the list of presets stored in the MediaMonkey.ini file. That button is enabled only if you have created a new preset (after the click on the New button) or if you have modified the Preset, Menu or Batch option of an existing mask. That means that you cannot have two or more presets with the same name under the same menu group. The next button is Del that could be used when you want to remove the selected preset from the list permanently, so be careful using it.

Tune preset
The last button in that row is Tune. If you click on it, you will get the Tune preset dialog box that allows fine adjustment of preset parameters represented with the corresponding tags in the Find what/Replace with strings without messing with their long and complicated strings. The Tune dialog box is similar to the one that you could get when you start a preset using menu/hotkey/toolbar, with only difference that the preset will not be applied when you click on the OK button in the Tune dialog, but it will get modified tags accordingly. However, even if you click on the OK button in the Tune dialog box, you still need to save modification of the preset using the Update/Add button.
The OK button in the Tune dialog box is visible only if you have the Modeless option turned off in the Options dialog box. In that modal mode you cannot continue working with the Preset Settings dialog box and the rest of the program until you close the Tune dialog. However, if you have turned on the Modeless option in the Options dialog box, you will be able to edit the preset using both the Preset Settings and Tune dialog boxes at the same time without a need to close the Tune dialog - the changes in one dialog box will be automatically reflected in another dialog.

Opening all three mentioned dialog boxes next to each other in modeless mode, Preset Settings, Choose Preset and Tune Preset, allows much easier and faster navigation and editing of the presets.
Description, Batch, Menu
The first control in the next row is the Description text box which could be used to enter any information about the selected preset, e.g. to describe its effect with some examples. The description will be also displayed as a hint if you hover a mouse over the corresponding menu item or toolbar button of the preset.
The Batch check box should be ticked on if you want to assign the selected preset to a batch group. All presets that belong to the same batch should have the same Menu name which will appear in the Batch Presets sub-menu. When you choose any batch from that sub-menu, the presets that belong to it will be applied in the same order as they are sorted in the list of presets.
Keep in mind that all presets inside one menu group should have unique names, even the presets assigned to the batch groups. So, if you want to assign a single preset to the same batch group two or more times, you should save that preset with different names for each needed instance. For example, if you want to apply the "Capitalize <Into Field>" preset to two or more fields using a single batch, you could add e.g. "Capitalize Artist", "Capitalize Title", and so on, presets to that batch. Of course, you should also adjust appropriately the destination field for each preset before saving it.
If you have turned on the Show dialog box for adjusting of the preset selected in the menu or toolbar option in the Options dialog box, after you start execution of a batch, the adjustment dialog box will contain only the dropdown lists for source/destination fields of individual contained presets, but the other tags of individual presets will be substituted with their default values. This means that all presets assigned to batches should have all parameters already set using the corresponding tags in the Find what and Replace with strings in the Preset Settings dialog box.
You could specify in which menu group you want to put the selected preset using the Menu combo box. You could choose an existing menu group or you could create a new one by typing its name. If you leave that box empty, the selected preset will be put in the Unclassified Presets sub-menu. The same combo box is used to specify the name of the batch group if the Batch check box is ticked on. Such batch group will appear in the Batch Presets sub-menu and you could select the corresponding menu item to start execution of that batch of presets.
Favorite, Icon, Hotkey
If you have a preset that you use very often and if you want to apply it without searching for it in the menu, you could mark it using the Favorite check box and such preset will be added to the Favorite Presets sub-menu. Also, you could choose if and how you want to get the favorite presets displayed in the toolbar using the options under the label "Presets having the Favorite option turned on in the Preset Settings dialog box:" in the Options dialog box.
If you have the option "Show as separate toolbar buttons" turned on, you will get displayed individual toolbar buttons for each favorite preset, so you could just directly click on these buttons to start their execution. If you have the option "Show in Favorite Presets toolbar menu" turned on, you will get displayed one toolbar button that shows a dropdown list of favorite presets when you click on it. This second option is preferred if you have a lot of favorite presets, but you don't want to have too many displayed toolbar buttons.
The toolbar buttons of this add-on are displayed on the Search toolbar in MM2-3 or in the RegExp Find and Replace toolbar in MM4. By the way, you need to click on the Update button to confirm any modification of the preset's settings, even if you just toggle the state of the Favorite check box.
If you have displayed individual toolbar buttons for each favorite preset, they could show a textual caption with the name of preset or an icon. Since the preset names are very long, their captions could be trimmed to the specified number of characters using the option Trim the caption of toolbar buttons (maximal number of characters) in the Options dialog box.
If you want to pack even more buttons on the toolbar, you could use the icons instead of the textual captions. You could assign the icon to the selected preset choosing it from the Icon dropdown list and that icon will be displayed in the presets menu and on the corresponding toolbar button. The icon could be loaded from an external .ico file or you could choose any internal MM's icon represented by its number (the built-in icons for the Glided skin with their numbers could be downloaded from here). The external .ico file could be specified after clicking on the same Icon combo box when the mouse pointer looks like a pointing hand. If you want to remove icon from the preset, i.e. to get the textual caption back on the toolbar button, you should choose the first (empty) item from the Icon dropdown list.
If you prefer the keyboard over the mouse, you could start execution of a preset by pressing a hotkey. To be able to do that, you need to assign the hotkey to the selected preset using the Hotkey text box, e.g. you could specify Shift+Ctrl+T.

Finding group
The following controls in the Preset Settings dialog box describe how the selected preset should perform. The first control in the next (finding) group is the Find what combo box/text box which is used to specify the string that we want to search for. The same control is used to specify the string that will be replaced in the destination field if the inverted mode is turned off using the Invert check box (more about it latter). The Find what combo box has a dropdown list with the history of the last 5 applied search strings.
The button and dropdown control, which are on the right side of the Find what combo box, could be used to insert the predefined text to the Find what combo box. The items in the list depend on the other preset settings, e.g. if Regular expression (F.) is ticked on, that list will contain Entire, Empty, Filled, Begin and End items, but if the VBScript (F.) is ticked on, it will contain Field, <From>, <Into>, <Str.> and < Num.> items. Those controls are not enabled if both Regular expression (F.) and VBScript (F.) are ticked off. With a click on that button you will insert the corresponding text into the Find what string, e.g. with the Entire item you will get the "^.*", which is the Regex replacement for the full content of the field.
The next combo box has two meanings, depending on the inverted mode set by the Invert check box: if the inverted mode is turned off, its label will display Into and with it we could specify the destination field that could be searched and modified; if the inverted mode is turned on, its label will display From and with it we could specify the source field only for searching.
The items in the Into/From dropdown lists represent the MediaMonkey fields that are available for searching/modification with this add-on and many of them have corresponding tags that are stored inside media files.
In general, the presets could be applied only on one destination field at once. However, the first item in the Into list (All Text Fields) is specific and it allows modification of several textual fields at once using the same replacement. You could specify which text fields you want to modify using settings in the Search sheet of the Options dialog box [MM3.1+], but please be careful with that option, especially with the specified Path field!
There are also two another ways to manipulate several (unrelated) fields at once. You could do that using several presets that will be applied in sequence if you have put them in a batch. And it is possible to write a single preset that could modify two or more fields at once, but you need to have a good VBScript knowledge to do that (please take a look at the "Swap <From Field> and <Into Field>" preset as an example).
The first combo box in the next row has several items that determine the type of information displayed in the following info box that is below the Find what control:
The Regular expression (F.) check box should be ticked on if you want to use regular expressions in the Find what string. The VBScript (F.) check box is enabled only in the inverted mode set by the Invert check box and it should be ticked on if you want to use VBScript conditions in the Find what string that determine if/when the replacement should occur.
The Find whole words only check box should be ticked on if you want to search only for whole words (otherwise any field text that contains the specified Find what string will be matched). It could be used only when the Regular expression (F.) is ticked off, since the regular expressions have their own way of finding whole words.
Match case
The previous three check boxes determine behavior of the string specified with the Find what control, while the next Match case check box determines behavior of both Find what and Replace with strings. It should be ticked on if you want to search and/or replace only parts of the string with the exact same case, e.g. if you want to find "i" but not "I".

Replacement group
The first control in the next (replacement) group is the Replace with combo box/text box which could be used for specifying a string that we want to use for the replacement. Similarly to the Find what combo box, that control has a dropdown list with the history of the last 5 applied replacement strings. The button and dropdown control that are next to the right side of the Replace with combo box have the same purpose as the similar controls on the right side of the Find what combo box, i.e. they could be used to insert a text to the Replace with string, depending on the chosen item from the dropdown list and the Regular expression (R.) and VBScript (R.) settings.
The next combo box has two meanings depending on the inverted mode set by the Invert check box, similarly to the combo box that is on the far right side of the Find what combo box. If the inverted mode is turned off, its label will have displayed From and is enabled only if the Regular expression (R.) or VBScript (R.) are ticked on. If the Regular expression (R.) is ticked on, then you could use the From list to specify the source field for the replacement. However, if the VBScript (R.) is ticked on, then you could use the From list to select a field which you want to paste into the Replace with string using the previous button and dropdown list, or you could choose the field which will be substituted instead of the <From Field> tag that you could have specified inside of the Replace with string (please read the Adjustment section regarding the <From Field> tag). If the inverted mode is turned on, the label of the mentioned combo box will have displayed Into and with it we could specify the destination field that will be modified.
The leftmost combo box in the next row has several items that determine the information displayed in the following info box that is below the Replace with control. The fist four items have the same behavior as the items in the similar combo box below the Find what control: Old <Into> (Original), Old <From> (Replacement), New <Into> (Result), New <From>. The remaining three items, (R) decode, (R) w/ <.> and (R) w/o <.>, have the similar purpose as the items (F) decode, (F) w/ <.> and (F) w/o <.> in the previous combo box, but instead of Find what string they will display the modified Replace with string.
You should tick on the Regular expression (R.) or VBScript (R.) check boxes if you want to use the corresponding expressions in the Replace with string.
Invert, Action
The Invert combo box should be ticked on for the so-called inverted mode when you could find something in one (From) field and use matched string to replace data in another (Into) field (in the freely available version of the add-on it was possible to replace data only in the same field that is also used to find data). This option is experimental and maybe I will change it in the future.
The Action combo box determines what will happen if you start some preset by menu/toolbar/hotkey. With the freely available version of the add-on, that action is always the same as when the Replace All button in the Preset Settings dialog box is applied to the files selected in the main filelist. However, with the Action option you could set another action that will be applied:
The effect of the corresponding buttons to those actions will be described latter.

File list
The table on the bottom of the Preset Settings dialog box shows 25 files surrounding the current file. It displays the old and new content of the chosen destination field in these files. The number of files shown in the table could be adjusted in the Options dialog box using the option Maximal number of table rows in the Preset Settings dialog box. Each row in the table has a check box in the first column; if that check box is ticked on, the corresponding file will be modified when using the Replace or Replace All button. With the check box on the left side of the table header you could tick on/off all files in the table.
The context menu of the table contains options that determine which column(s) will be displayed in the table: Path and From Field. The Path option always displays the Path of the files, as it was the case with the old versions of the add-on. The From Field option could display the old/new content of From field, which is useful with the presets that modify both source and destination fields at once, e.g. many "Move..." presets.

"^" / "_" (toggling dialog mode)
The first button on the bottom of the Preset Settings dialog box toggles the visibility of controls in that dialog and it has two possible captions: "^" and "_". If the Settings dialog box contains all previously mentioned controls, that button has the "^" caption. However, if you click on that button it will have the "_" caption, while almost all other controls from that dialog will be replaced by two large multi-line text boxes in which you could type the Find what and Replace with strings, which is useful with long strings. If you click on the "_" button, all other controls from the Settings dialog box will be displayed again and the two mentioned multi-line text boxes will be replaced with the combo boxes.
? (Quick reference)
If you click on the next "?" button you will get the short reference for the Regular expressions and custom VBScript functions used in this add-on, which will be displayed instead of the mentioned table with files; if you click on the same button again, that file table will return.
Selection of file in the table
The number of the current file (on which you could apply the Replace option) is displayed in the text box in the left-bottom corner of the dialog box and the field's content of that file is displayed in the previously mentioned info boxes that are below the Find what and Replace with combo boxes. The first up/down buttons next to that text box serve to change the current file in steps by one, while the following up/down buttons change it in 25 steps, i.e. one page up or down in the table.
The next button (which looks more like a text box) displays the total number of files that are selected/visible in the main filelists. If you click on that button you will toggle between selected and visible files. That means that you could apply the preset on all visible files without selecting them all in the filelist.
Find, Replace
The Find Next/Find Prev button could be used to locate the next/previous file that matches criteria specified with the controls in the finding group and that file would become the current one. The searching direction could be set with the arrow button that is next to the mentioned button.
The Replace button could be used to apply the selected preset to the current file; after that, the next/previous file that matches the specified criteria becomes the current file. The Replace All button could be used to apply the selected preset to all files that are selected/visible in the main filelist (be very careful when doing that).
Keep/Select files in the main filelist
The last button at the bottom row before the Close button has several possible actions which could be chosen from the list after clicking on the part of button with the down arrow: Keep matched, Select matched, Keep unmatched, Select unmatched, Keep replaceable, Select replaceable, Keep irreplaceable and Select irreplaceable. None of those options modify fields/tags in files, but they could show which files have fields that could/couldn't be found/modified using the selected preset.
If you choose any of "Keep ..." options, you will get removed all files from the main filelist that don't satisfy the selected option. For example, if you choose Keep replaceable option, it will display only files that could be surely modified if you apply the Replace All option when using the selected preset. Similarly, if you choose any "Select ..." option you would get selected files in the main filelist that satisfy the selected option without removing other files.

Manage RegExp Presets
The Manage RegExp Presets dialog box is similar to the mentioned Choose RegExp Preset dialog box with the same Find options for searching presets, but it also contains several additional controls that allow some operations on the preset(s) selected/checked in the table. There are two radio buttons on the top of the dialog box: MediaMonkey.ini and File. If you select the MediaMonkey.ini option, you will get displayed all RegExp presets that are stored in the main MediaMonkey INI file, i.e. the presets that are displayed in the RegExp menus. In this case, you will be able to export/import presets from/to the MediaMonkey.ini file, as well as to add/edit, delete or move them.
If you choose the File option, you could get displayed presets from an external INI file, which could contain e.g. your previously exported RegExp presets. You could type its path in the following text box or you could click on the "..." button and find that .ini file in the new Open File dialog box. Using this option, you will be able to export/import presets from/to the specified .ini file, as well as to delete or move them (if the loaded .ini file is not marked on open as read-only).
Selecting/checking of the preset(s) on which you want to implement an operation could be done in two ways: you could use the check boxes located on the left side of the table or you could select the wanted preset directly in the table. When using the second way, you could select only one preset at the time and that way has a precedence over the first one, i.e. even if you have some or all presets checked on in the table, if you choose an operation as Delete, it will be applied only on the selected preset, but not on the checked ones.
If you want to deselect the currently selected preset, e.g. if you want to do an operation on the checked presets, then you should click again on the already selected preset to deselect it. The topmost check box could be used to toggle all individual check boxes on or off if none preset is selected. However, if any preset is selected, the topmost check box could be used to deselect that preset.
If you want to select multiple consequent rows at once, firstly click on the check box of the first row in the range to tick it on or off, then press Shift key and without releasing it click on the check box of the last row in the range.
You could sort all presets and/or menu groups to which they belong using the Sort by dropdown list, which has several options for sorting:
Let say that I have the next order of presets in the .ini file (yes, the presets could be unsorted in .ini file):
Preset2=Menu_A\Name_C
Preset1=Menu_B\Name_B
Preset3=Menu_B\Name_A
- sorting by the preset number will produce:
Menu_B\Name_B (Preset1)
Menu_A\Name_C (Preset2)
Menu_B\Name_A (Preset3)
- the menu position will produce:
Menu_B\Name_B (Preset1)
Menu_B\Name_A (Preset3)
Menu_A\Name_C (Preset2)
- the name in menu will produce:
Menu_B\Name_A (Preset3)
Menu_B\Name_B (Preset1)
Menu_A\Name_C (Preset2)
- the menu and name will produce:
Menu_A\Name_C (Preset2)
Menu_B\Name_A (Preset3)
Menu_B\Name_B (Preset1)
- the name only will produce:
Menu_B\Name_A (Preset3)
Menu_B\Name_B (Preset1)
Menu_A\Name_C (Preset2)
After choosing the sorting method from the Sort by dropdown list, the presets will be sorted only in the table. If you click on the table header that contains displayed the information about loaded presets, the chosen order will be permanently applied to the .ini file. This operation is not reversible, so be careful using this option and make a backup of your presets first. Before you choose option for permanent sorting of presets, you should know that the order of presets in the list is important for the execution of batches. The batches execute their containing presets in the same order as they are placed in the list. So, if you sort the list of presets alphabetically, you could get an unwanted order of presets inside batches!
On the right side of the table header is located the Word wrap check box that could be used to toggle the way how the presets will be displayed in the table.
The Find text box and the Next/Prev buttons on the bottom of the Manage RegExp Presets dialog box have the same function as the same controls in the Choose RegExp Preset dialog box, i.e. to find the presets in the table that contain the specified text.
The Move operation could be done only on a single selected preset at the time. Using the Up and Down buttons, you could move the selected preset in the appropriate direction in the list of presets. Those two buttons have the auto-repeat possibility, i.e. it is enough to click on any of them and the selected preset will continue to move in the table until you release that button.

The next button in the Manage RegExp Presets dialog box has two possible captions: Add and Edit. It will have the Add caption if you don't have any preset selected in the table; if you click on that button, you would get opened the Add RegExp Preset dialog box that is the same as the Edit RegExp Preset dialog box, but it contains all controls set to their initial (blank) state and it allows adding of a new preset to the list of presets.
If you select any preset in the table, the mentioned button will have the Edit caption; if you click on that button, the Edit RegExp Preset dialog box will open (which is very similar to the Preset Settings dialog box); in this case all controls in that dialog box will be set accordingly to the selected preset, which means that you could modify the existing presets from the Manage RegExp Presets dialog box. You could also open the Edit RegExp Preset dialog box if you click the serial number of preset displayed in the "#" column of the table.
You could use the Delete button if you want to remove the selected/checked preset(s) from the .ini file permanently, so be careful using it.
The Save and Load buttons are similar in effect to the Export and Import buttons. The main difference is that when using the Export and Import you will be asked for the name of the target/source .ini file. On the other side, the Save and Load commands are as a kind of the Copy/Paste options, they use the intermediary file (RegExpReplacePresets.ini) without asking for the name of a file. The Export command is the same, more or less, as in the previous versions of the add-on, i.e. it allows exporting of the selected/checked preset(s). However, it is now possible to use that same command to export presets not only from the MediaMonkey.ini file, but also from the .ini file specified in the File text box (if that option is selected), i.e. you could now export files from one external .ini file to another .ini file. The same apply to the Save command, which could be used to save presets from the MediaMonkey.ini file or from the external .ini file, depending on the two topmost radio buttons.
Similarly, the Import command in the previous versions of the add-on allowed import of presets only from the external .ini file, specified in the File text box, to the MediaMonky.ini file, when the File radio button was selected. However, the new version of the add-on allows import of presets either to the MediaMonkey.ini file or to the external .ini file, depending on the two topmost radio buttons, which determines the target of import. The same apply to the Load command.
If you have selected any preset in the table, the imported/loaded presets will be inserted before the selected preset in the table, i.e. at the same position. However, if you want to import/load presets to the end of the list, you should not have any preset selected in the table.
If you choose the Import command, you will get imported all presets that are contained in the .ini file specified in the new Open dialog box. However, if you want to import only particular preset(s) from that .ini file, you cannot use the Import command, but you need to use the next two operations:
1. choose the source .ini file using the MediaMonkey.ini or File option, select/check the wanted presets and choose Save command;
2. choose the target .ini file using the MediaMonkey.ini or File option, select the position in the table where you want to import the presets and choose Load command.

If the Manage RegExp Presets dialog box is horizontally too narrow, one spin control will be displayed instead of two Next/Prev buttons, another spin control will be displayed instead of two Up/Down buttons and the Export and Import buttons will be displayed just as the "..." buttons next to the Save and Load buttons. In that case, be careful not to use the Save button instead of the following "..." button if you want to export presets to the external .ini file, because they will be saved only temporarily to the intermediary file.
Options
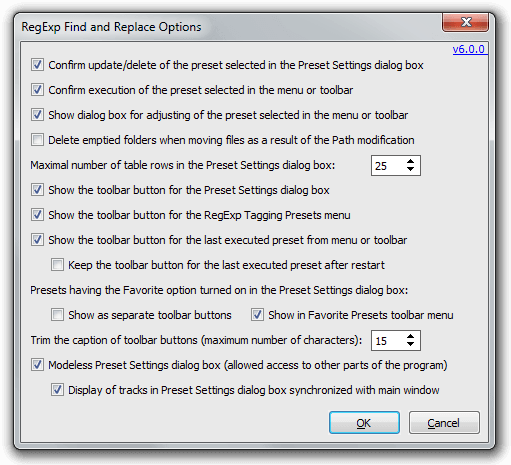
The RegExp Find and Replace Options dialog box contains some less important options that affect behavior of the add-on and/or all presets in general. You could open this dialog box more than one way:
1) if you choose the Options command in the RegExp Find and Replace sub-menu of the File menu, the RegExp Tagging Presets toolbar menu (light bulb) or the context menus of the main filelist and Now Playing panel, or
2) if you select RegExp Find and Replace add-on in the Tools / Extensions dialog box and click on the Options button.
The same options could be found on the General / RegExp Find and Replace page in the Tools / Options dialog box.
- Keep the toolbar button for the last executed preset after restart: you should turn on this option if you want to get displayed the toolbar button for the last executed preset after restart of the program; this option is enabled when the previous option is turned on.
- Show as separate toolbar buttons: you should turn on this option if you want to get displayed individual toolbar buttons for each preset that has the Favorite option turned on.

- Show in Favorite Presets toolbar menu: you should turn on this option if you want to get displayed one toolbar button that shows a dropdown list of favorite presets when you click on it.

- Display of tracks in Preset Settings dialog box synchronized with main window: if you turn off this option the table of files in the Preset Settings dialog box will not change when you change the selection of files in the main filelist; this option is enabled when the previous option is turned on (you could change selection of files in the main filelist only if the Preset Settings dialog box is modeless).

This add-on has a possibility to display a resizable dialog box for the adjustment of a preset, if it is prepared adequately, whenever you start its execution using menu/toolbar/hotkey. Using those dialog boxes is much simpler than the Preset Settings dialog box which has many controls that are confusing for beginners. For example, you could choose Edit > RegExp Find and Replace > Field Manipulations > Copy <From Field> to <Into Field>... and you would get the dialog box with just two dropdown lists for choosing the source and the destination fields. The number of displayed controls depends on the adjustment tags that are used in the preset.
If the name of preset contains <Into Field> tag, you will get the adjustment dialog box with one dropdown list from which you could choose the destination field after you start the execution of preset. Similarly, if you specify <From Field> tag in the name of preset, you would get the dialog box with the dropdown list for choosing the source field. Of course, if you specify both <Into Field> and <From Field> in the name of the preset, you would get the dialog box with both dropdown lists. For example, the included preset "Copy <From Field> to <Into Field>..." displays both lists.
If you specify custom parameters inside of the Find what and Replace with strings using the <String Caption="xxx" Value="yyy"> tag, you would get the adjustment dialog box with the text box in which you could write some string and that string would be entered into same place in the Find what/Replace with string where you have put that <String> tag. Also, if you specify the <Number Caption="xxx" Value="yyy"> tag, you would get the dialog box with the spin/slider controls for choosing the numeric value. For example, if you write <Number Caption="Increment" Value="10"> instead of 10 in some preset, you would get the dialog box which allows adjusting of that numeric value.
The Value argument is mandatory for those two tags. The Caption argument allows you to specify descriptive text which would be displayed next to the control; it is not necessary to be specified, but it would be better for understanding of such preset if you use it. The <Number> tag additionally allows to specify two optional arguments: MinValue and MaxValue, the first one is for specifying the minimum value which could be entered with the spinedit control, and the second one is for the maximum value. If you omit those arguments, the default values are 0 and 100 correspondingly.
You could specify as many <String> and <Number> tags in the Find what and Replace with string as you want, and you would get the adequate number of controls within the preset dialog box. Of course, those controls would be displayed together with the source and the destination dropdown lists if you have <From Field> and/or <Into Field> in the name of the same preset. For example, the included preset "Replace specified string with another one in <Into Field>..." has the adjustment dialog box with the destination dropdown list and two text box controls - the first one is for specifying the string which would be replaced and the other one is for specifying the replacement string.
The new version of the add-on also supports the <If>, <Else>, <End If> and <ID> tags. The <If> <Else> <End If> construction of tags allows conditional execution of some parts of the Find what/Replace with strings.
The <If> tag has three different forms:
1) The standard one is when you specify the Caption and Value arguments. It could have 0 and 1 as a Value argument, or "False" and "True".
If the Value is 1, the text between <If> and <End If> tags will be included in the Find what/Replace with strings; otherwise, if the Value is 0, the text will be omitted.
If the Value is 1 and if <Else> tag is specified between <If> and <End If> tags, then only the text between <If> and <Else> tags will be included in the Find what/Replace with strings, but the text between <Else> and <End If> tags will be omitted; if the Value is 0, the text between <If> and <Else> tags will be omitted and the text between <Else> and <End If> tags will be included.
If you use the <Else> tag without the Caption argument, the whole <If> <Else> <End If> construction will be displayed as a check box in the Adjust dialog box. However, if you specify the Caption argument in the <Else> tag, the same construction will be displayed as a group containing two radio buttons: the first button will display the Caption specified in the <If> tag, and the second one will display the Caption specified in the <Else> tag.
The <If> tag in the first form could have a specified ID argument as well.
2) The second form of the <If> tag is when you specify only the ID argument. In this case it could be treated as if it has a Value as another <If> tag with the same ID argument that has specified the Value argument. The second form (with only ID argument) is not displayed in the Adjust dialog box as any control, but its nested controls/tags will be displayed next to the controls/tags contained in the corresponding <If> tag that has specified the Value argument.
3) The third form is when you specify the Value argument without the Caption argument. This form will not be displayed in the Adjust dialog box either. It is mostly useful if you want to specify some VBscript expression in the Value argument, e.g. <If Value="Len(""<ID:2>"") > 0"> ... <End If>, which will have included/excluded text in the Find what/Replace with strings depending on the result of that expression.
The <End If> tags should not have any specified argument.
The text between <If> and <End If> tags could contain other tags which would have corresponding controls enabled if the Value of <If> tag is 1. The text between <If> and <End If> tags could contain other <If> / <End If> blocks as well, which means that they could be nested without any limit on depth.
The <ID> tag allows the same text to be used several times in the Find what/Replace with string without its repeating and should have only one argument, e.g. <ID=1>. That tag will be replaced in the string during run-time with the Value argument of another <String>/<Number>/<If> tag that has the same ID argument. The ID argument could also be used to specify the order of controls in the dialog box.
Adding any of those mentioned tags to the presets is optional. The presets with those tags are longer and somewhat harder to write, but you could do that just once and after that their adjustment using the adjustment dialog box will be child's play. Of course, many of the predefined presets are already written with such tags, so you could use them out of the box.
The adjustment dialog boxes that you get when you choose presets by menu/toolbar/hotkey are similar to the Tune dialog box that could be opened from the Preset Settings dialog box; with the difference being that the preset will actually be applied to them when you click on the OK button in them.
The adjustment dialog boxes also have the Don't show this dialog anymore check box on the bottom. If you have ticked on that check box, after confirming execution of the preset, the subsequent presets started by menu/toolbar/hotkey will be applied without displaying the adjustment dialog box. If you want to have the adjustment dialog box displayed again, you should turn on the Show dialog box for adjusting of the preset selected in the menu or toolbar option in the Options dialog box.
- Basic manipulations
- Replace specified string with another one in <Into Field>...
- Replace acute and grave accents with apostrophes in <Into Field>...
- Replace left/right double apostrophes with quotation marks in <Into Field>...
- Replace new line characters (CR/LF) with specified string in <Into Field>...
- Replace last ", " with " & " in <Into Field>...
- Remove multiple spaces from <Into Field>...
- Remove leading and trailing spaces from <Into Field>...
- Add spaces between words without spaces in <Into Field>...
- Add space before brackets in <Into Field> if missing...
- Remove spaces between punctuation marks and brackets in <Into Field>...
- Assign specified string to <Into Field>...
- Remove specified string from <Into Field>...
- Remove http:// address from <Into Field>...
- Remove iTunes info from Comment field
- Clear <Into Field> (textual)...
- Clear/Reset <Into Field>...
- Clear <Into Field> if it is equal to <From Field>...
- Reset Track Volume field
- Adjust maximal value of Track Volume to 1.0
- Reset release Date field
- Reset Last played field
- Assign current date/time to Last played field
- Increment Play counter by 1
- Decrement Play counter by 1
- Assign specified value to Play counter...
- Assign specified value to Playback position (%)...
- Increase Rating by half star
- Decrease Rating by half star
- Round half star Rating to full star
- Remove month and day from release Date
- Assign release Date to Original Date only if it is undefined
- Parse <From Field> using specified mask...
- Field manipulations
- Copy <From Field> to <Into Field>...
- Swap <From Field> and <Into Field>...
- Move <From Field> to <Into Field>...
- Remove <From Field> from the start of <Into Field> before (and including) specified string...
- Remove <From Field> from the end of <Into Field> after (and including) specified string...
- Remove "prefix"<From Field>"suffix" from <Into Field>...
- Insert <From Field> to <Into Field> after specified number of characters...
- Insert <From Field> to <Into Field> before specified number of characters...
- Insert <From Field> to <Into Field> after specified number of words...
- Insert <From Field> to <Into Field> before specified number of words...
- Insert <From Field> to <Into Field> before specified string...
- Insert <From Field> to <Into Field> after specified string...
- Insert <From Field> to <Into Field> before left-specified instance of specified string...
- Insert <From Field> to <Into Field> after left-specified instance of specified string...
- Insert <From Field> to <Into Field> before right-specified instance of specified string...
- Insert <From Field> to <Into Field> after right-specified instance of specified string...
- Move <From Field> to <Into Field> after specified number of characters...
- Move <From Field> to <Into Field> before specified number of characters...
- Move <From Field> to <Into Field> after specified number of words...
- Move <From Field> to <Into Field> before specified number of words...
- Move <From Field> to <Into Field> before specified string...
- Move <From Field> to <Into Field> after specified string...
- Move <From Field> to <Into Field> before left-specified instance of specified string...
- Move <From Field> to <Into Field> after left-specified instance of specified string...
- Move <From Field> to <Into Field> before right-specified instance of specified string...
- Move <From Field> to <Into Field> after right-specified instance of specified string...
- Word manipulations
- Move prefixes (The, A, An) to the start in <Into Field>...
- Move prefixes (The, A, An) to the end of <Into Field>...
- Assign <From Field> to <Into Field> with moved prefixes to the end...
- Assign <From Field> to <Into Field> with moved prefixes to the start...
- Swap first and last name of <Into Field> with added ", "...
- Swap last and first name of <Into Field> with removed ", "...
- Assign <From Field> to <Into Field> with swapped first and last name and added ", "...
- Assign <From Field> to <Into Field> with swapped last and first name and removed ", "...
- Swap first two words of <Into Field>...
- Swap nn-th and mm-th words of <Into Field>...
- Copy specified number of words from the start of <From Field> to <Into Field>...
- Copy the left side of <From Field> before specified number of words to <Into Field>...
- Copy specified number of words from the end of <From Field> to <Into Field>...
- Copy the right side of <From Field> after specified number of words to <Into Field>...
- Copy specified number of words after left-specified position in <From Field> to <Into Field>...
- Copy specified number of words before right-specified position in <From Field> to <Into Field>...
- Remove specified number of words from the start of <Into Field>...
- Remove specified number of words from the end of <Into Field>...
- Remove specified number of words after left-specified position in <Into Field>...
- Remove specified number of words before right-specified position in <Into Field>...
- Keep only specified number of words on the start of <Into Field>...
- Keep only specified number of words on the end of <Into Field>...
- Keep only specified number of words after left-specified position in <Into Field>...
- Keep only specified number of words before right-specified position in <Into Field>...
- Move specified number of words from the start to the end of <Into Field>...
- Move specified number of words from the end to the start of <Into Field>...
- Move specified number of words from the start of <From Field> to <Into Field>...
- Move the left side of <From Field> before specified number of words to <Into Field>...
- Move specified number of words from the end of <From Field> to <Into Field>...
- Move the right side of <From Field> after specified number of words to <Into Field>...
- Move specified number of words after left-specified position in <From Field> to <Into Field>...
- Move specified number of words before right-specified position in <From Field> to <Into Field>...
- Character manipulations
- Copy specified number of characters from the start of <From Field> to <Into Field>...
- Copy the left side of <From Field> before right-specified number of characters to <Into Field>...
- Copy specified number of characters from the end of <From Field> to <Into Field>...
- Copy the right side of <From Field> after left-specified number of characters to <Into Field>...
- Assign +/- specified # of characters from +/- specified position in <From Field> to <Into Field>...
- Remove specified number of characters from the start of <Into Field>...
- Remove specified number of characters from the end of <Into Field>...
- Remove +/- specified number of characters at +/- specified position in <Into Field>...
- Keep only specified number of characters on the start of <Into Field>...
- Keep only specified number of characters on the end of <Into Field>...
- Keep only +/- specified number of characters at +/- specified position in <Into Field>...
- Move specified number of characters from the start to the end of <Into Field>...
- Move specified number of characters from the end to the start of <Into Field>...
- Move specified number of characters from the start of <From Field> to <Into Field>...
- Move the left side of <From Field> before right-specified number of characters to <Into Field>...
- Move specified number of characters from the end of <From Field> to <Into Field>...
- Move the right side of <From Field> after left-specified number of characters to <Into Field>...
- Move +/- specified number of characters from +/- specified position in <From Field> to <Into Field>...
- Add/remove strings
- Add "The" prefix to the start of <Into Field>...
- Remove prefixes (The, A, An) from <Into Field>...
- Add " (Live)" to the end of <Into Field>...
- Remove " (Live)" or " [Live]" from the end of <Into Field>...
- Append specified string to the start of <Into Field> followed by separator if not empty...
- Append specified string to the end of <Into Field> preceded by separator if not empty...
- Remove specified string from the start of <Into Field>...
- Remove specified string from the end of <Into Field>...
- Remove specified string from <Into Field> after specified number of characters...
- Remove specified string from <Into Field> before specified number of characters...
- Remove specified string from <Into Field> after specified number of words...
- Remove specified string from <Into Field> before specified number of words...
- Remove specified string from <Into Field> before leftmost another specified string...
- Remove specified string from <Into Field> after leftmost another specified string...
- Remove specified string from <Into Field> before rightmost another specified string...
- Remove specified string from <Into Field> after rightmost another specified string...
- Remove specified string from <Into Field> after left-specified instance of another specified string...
- Remove specified string from <Into Field> before right-specified instance of another specified string...
- Remove specified string from <Into Field> between specified number of characters...
- Remove specified string from <Into Field> between specified number of words...
- Remove specified string from <Into Field> between two another specified strings...
- Remove specified string from <Into Field> between specified instances of another specified strings...
- Insert specified string to <Into Field> after specified number of characters...
- Insert specified string to <Into Field> before specified number of characters...
- Insert specified string to <Into Field> after specified number of words...
- Insert specified string to <Into Field> before specified number of words...
- Insert specified string to <Into Field> before leftmost another specified string...
- Insert specified string to <Into Field> after leftmost another specified string...
- Insert specified string to <Into Field> before rightmost another specified string...
- Insert specified string to <Into Field> after rightmost another specified string...
- Insert specified string to <Into Field> before left-specified instance of another specified string...
- Insert specified string to <Into Field> after left-specified instance of another specified string...
- Insert specified string to <Into Field> before right-specified instance of another specified string...
- Insert specified string to <Into Field> after right-specified instance of another specified string...
- Limited replacements
- Replace specified string with another one in <Into Field> after specified number of characters...
- Replace specified string with another one in <Into Field> before specified number of characters...
- Replace specified string with another one in <Into Field> after specified number of words...
- Replace specified string with another one in <Into Field> before specified number of words...
- Replace specified string with another one in <Into Field> before leftmost another specified string...
- Replace specified string with another one in <Into Field> after leftmost another specified string...
- Replace specified string with another one in <Into Field> before rightmost another specified string...
- Replace specified string with another one in <Into Field> after rightmost another specified string...
- Replace specified string with another one in <Into Field> after left-specified instance of another specified string...
- Replace specified string with another one in <Into Field> before right-specified instance of another specified string...
- Replace specified string with another one in <Into Field> between specified number of characters...
- Replace specified string with another one in <Into Field> between specified number of words...
- Replace specified string with another one in <Into Field> between two another specified strings...
- Replace specified string with another one in <Into Field> between specified instances of another specified strings...
- Replace leftmost part of <Into Field> between specified strings with <From Field>...
- Replace leftmost part of <Into Field> between (and including) specified strings with "prefix"<From Field>"suffix"...
- Replace leftmost part of <Into Field> between (and including) specified strings with another specified string...
- Replace rightmost part of <Into Field> between specified strings with <From Field>...
- Replace rightmost part of <Into Field> between (and including) specified strings with "prefix"<From Field>"suffix"...
- Replace rightmost part of <Into Field> between (and including) specified strings with another specified string...
- Replace left-specified part of <Into Field> between specified strings with <From Field>...
- Replace left-specified part of <Into Field> between (and including) specified strings with "prefix"<From Field>"suffix"...
- Replace left-specified part of <Into Field> between (and including) specified strings with another specified string...
- Replace right-specified part of <Into Field> between specified strings with <From Field>...
- Replace right-specified part of <Into Field> between (and including) specified strings with "prefix"<From Field>"suffix"...
- Replace right-specified part of <Into Field> between (and including) specified strings with another specified string...
- Move field parts
- Move leftmost part of <Into Field> including specified enclosing strings to +/- specified character position...
- Move leftmost part of <Into Field> between (and including) specified strings to +/- specified character position...
- Move rightmost part of <Into Field> including specified enclosing strings to +/- specified character position...
- Move rightmost part of <Into Field> between (and including) specified strings to +/- specified character position...
- Move left-specified part of <Into Field> including specified enclosing strings to +/- specified character position...
- Move left-specified part of <Into Field> between (and including) specified strings to +/- specified character position...
- Move right-specified part of <Into Field> including specified enclosing strings to +/- specified character position...
- Move right-specified part of <Into Field> between (and including) specified strings to +/- specified character position...
- Move leftmost part of <Into Field> including specified enclosing strings to +/- specified word position...
- Move leftmost part of <Into Field> between (and including) specified strings to +/- specified word position...
- Move rightmost part of <Into Field> including specified enclosing strings to +/- specified word position...
- Move rightmost part of <Into Field> between (and including) specified strings to +/- specified word position...
- Move left-specified part of <Into Field> including specified enclosing strings to +/- specified word position...
- Move left-specified part of <Into Field> between (and including) specified strings to +/- specified word position...
- Move right-specified part of <Into Field> including specified enclosing strings to +/- specified word position...
- Move right-specified part of <Into Field> between (and including) specified strings to +/- specified word position...
- Move leftmost part of <Into Field> including specified enclosing strings before leftmost specified another string...
- Move leftmost part of <Into Field> including specified enclosing strings after leftmost specified another string...
- Move leftmost part of <Into Field> including specified enclosing strings before rightmost specified another string...
- Move leftmost part of <Into Field> including specified enclosing strings after rightmost specified another string...
- Move rightmost part of <Into Field> including specified enclosing strings before leftmost specified another string...
- Move rightmost part of <Into Field> including specified enclosing strings after leftmost specified another string...
- Move rightmost part of <Into Field> including specified enclosing strings before rightmost specified another string...
- Move rightmost part of <Into Field> including specified enclosing strings after rightmost specified another string...
- Move left-specified part of <Into Field> between (and including) specified strings after left-specified instance of another string...
- Move left-specified part of <Into Field> between (and including) specified strings before right-specified instance of another string...
- Move right-specified part of <Into Field> between (and including) specified strings after left-specified instance of another string...
- Move right-specified part of <Into Field> between (and including) specified strings before right-specified instance of another string...
- Partial manipulations
- Copy leftmost part of <From Field> between specified strings to <Into Field>...
- Copy leftmost part of <From Field> between (and including) specified strings to <Into Field>...
- Copy rightmost part of <From Field> between specified strings to <Into Field>...
- Copy rightmost part of <From Field> between (and including) specified strings to <Into Field>...
- Copy left-specified part of <From Field> between specified strings to <Into Field>...
- Copy left-specified part of <From Field> between (and including) specified strings to <Into Field>...
- Copy right-specified part of <From Field> between specified strings to <Into Field>...
- Copy right-specified part of <From Field> between (and including) specified strings to <Into Field>...
- Remove all parts of <Into Field> between (and including) specified strings...
- Remove leftmost part of <Into Field> between (and including) specified strings...
- Remove rightmost part of <Into Field> between (and including) specified strings...
- Remove left-specified part of <Into Field> between (and including) specified strings...
- Remove right-specified part of <Into Field> between (and including) specified strings...
- Keep leftmost part of <Into Field> between (and including) specified strings...
- Keep rightmost part of <Into Field> between (and including) specified strings...
- Keep left-specified part of <Into Field> between (and including) specified strings...
- Keep right-specified part of <Into Field> between (and including) specified strings...
- Swap leftmost parts of <Into Field> between specified strings...
- Swap rightmost parts of <Into Field> between specified strings...
- Swap leftmost and rightmost parts of <Into Field> between specified strings...
- Move leftmost part of <From Field> between specified strings to <Into Field>...
- Move leftmost part of <From Field> between (and including) specified strings to <Into Field>...
- Move rightmost part of <From Field> between specified strings to <Into Field>...
- Move rightmost part of <From Field> between (and including) specified strings to <Into Field>...
- Move left-specified part of <From Field> between specified strings to <Into Field>...
- Move left-specified part of <From Field> between (and including) specified strings to <Into Field>...
- Move right-specified part of <From Field> between specified strings to <Into Field>...
- Move right-specified part of <From Field> between (and including) specified strings to <Into Field>...
- Separated field parts
- Copy the left side of <From Field> before specified string to <Into Field>...
- Copy the left side of <From Field> before (and including) specified string to <Into Field>...
- Copy the right side of <From Field> after specified string to <Into Field>...
- Copy the right side of <From Field> after (and including) specified string to <Into Field>...
- Copy left-specified part of <From Field> between instances of specified string to <Into Field>...
- Copy left-specified part of <From Field> (including instances of specified string) to <Into Field>...
- Copy right-specified part of <From Field> between instances of specified string to <Into Field>...
- Copy right-specified part of <From Field> (including instances of specified string) to <Into Field>...
- Copy part of <From Field> between (and including) specified instances of string to <Into Field>...
- Remove the left side of <Into Field> before specified string...
- Remove the right side of <Into Field> after specified string...
- Remove left-specified part of <Into Field> between instances of specified string...
- Remove left-specified part of <Into Field> between (and including) instances of specified string...
- Remove right-specified part of <Into Field> between instances of specified string...
- Remove right-specified part of <Into Field> between (and including) instances of specified string...
- Remove part of <Into Field> between (and including) specified instances of string...
- Keep the left side of <Into Field> before specified string...
- Keep the right side of <Into Field> after specified string...
- Keep left-specified part of <Into Field> between instances of specified string...
- Keep left-specified part of <Into Field> between (and including) instances of specified string...
- Keep right-specified part of <Into Field> between instances of specified string...
- Keep right-specified part of <Into Field> between (and including) instances of specified string...
- Keep part of <Into Field> between (and including) specified instances of string...
- Swap text separated by specified string in <Into Field>...
- Move the left side of <From Field> before specified string to <Into Field>...
- Move the left side of <From Field> (including specified string) to <Into Field>...
- Move the right side of <From Field> after specified string to <Into Field>...
- Move the right side of <From Field> (including specified string) to <Into Field>...
- Move left-specified part of <From Field> between instances of specified string to <Into Field>...
- Move left-specified part of <From Field> (including instances of specified string) to <Into Field>...
- Move right-specified part of <From Field> between instances of specified string to <Into Field>...
- Move right-specified part of <From Field> (including instances of specified string) to <Into Field>...
- Move part of <From Field> between (and including) specified instances of string to <Into Field>...
- Strings inside brackets
- Copy [(the start)] of <From Field> to <Into Field> (if exists)...
- Copy [(the end)] of <From Field> to <Into Field> (if exists)...
- Remove (<From Field>) from the start of <Into Field>...
- Remove (<From Field>) from the end of <Into Field>...
- Remove (...) or [...] from the start of <Into Field>...
- Remove (...) or [...] from the end of <Into Field>...
- Remove all parentheses and brackets from <Into field>...
- Remove parentheses that don't have pair from <Into Field>...
- Remove brackets that don't have pair from <Into Field>...
- Fix parentheses that don't have pair in <Into Field>...
- Fix brackets that don't have pair in <Into Field>...
- Replace all [...] with (...) in <Into Field>...
- Replace all (...) with [...] in <Into Field>...
- Replace [...] with (...) only at the end of <Into Field>...
- Replace (...) with [...] only at the end of <Into Field>...
- Replace [ or { with ( and ] or } with ) in <Into Field>...
- Swap last two parts of <Into Field> between parentheses...
- Swap last two parts of <Into Field> between ( . ) or [ . ]...
- Copy string within leftmost [(prefix ...)] in <From Field> to <Into Field> (if exists)...
- Copy string within rightmost [(prefix ...)] in <From Field> to <Into Field> (if exists)...
- Remove leftmost [(prefix ...)] from <Into Field>...
- Remove rightmost [(prefix ...)] from <Into Field>...
- Remove all instances of [(prefix ...)] from <Into Field>...
- Copy string within leftmost [(... suffix)] in <From Field> to <Into Field> (if exists)...
- Copy string within rightmost [(... suffix)] in <From Field> to <Into Field> (if exist)...
- Remove leftmost [(... suffix)] from <Into Field>...
- Remove rightmost [(... suffix)] from <Into Field>...
- Remove all instances of [(... suffix)] from <Into Field>...
- Move string within leftmost [(prefix ...)] in <From Field> to <Into Field> (if exists)...
- Move string within rightmost [(prefix ...)] in <From Field> to <Into Field> (if exists)...
- Move string within leftmost [(... suffix)] in <From Field> to <Into Field> (if exists)...
- Move string within rightmost [(... suffix)] in <From Field> to <Into Field> (if exists)...
- Multi-item fields
- Add specified string as first item to multi-item <Into Field>...
- Add specified string as last item to multi-item <Into Field>...
- Append <From Field> to the start of <Into Field> as first item using ";" as separator...
- Append <From Field> to the end of <Into Field> as last item using ";" as separator...
- Copy specified # of items from the start of multi-item <From Field> to <Into Field>...
- Copy the start of multi-item <From Field> before specified # of items to <Into Field>...
- Copy specified # of items from the end of multi-item <From Field> to <Into Field>...
- Copy the end of multi-item <From Field> after specified # of items to <Into Field>...
- Remove specifed number of items from the start of multi-item <Into Field>...
- Keep specifed number of items on the start of multi-item <Into Field>...
- Remove specifed number of items from the end of multi-item <Into Field>...
- Keep specifed number of items on the end of multi-item <Into Field>...
- Move specified # of items from the start of multi-item <From Field> to <Into Field>...
- Move the start of multi-item <From Field> before specified # of items to <Into Field>...
- Move specified # of items from the end of multi-item <From Field> to <Into Field>...
- Move the end of multi-item <From Field> after specified # of items to <Into Field>...
- Remove duplicate items in multi-item <Into Field>...
- Remove <From Field> item from multi-item <Into Field>...
- Move specified item to the start of multi-item <Into Field>...
- Move specifed number of items from the start to the end of multi-item <Into Field>...
- Move specifed number of items from the end to the start of multi-item <Into Field>...
- Reorder multi-item Artists alphabetically
- Sort items in multi-item <Into Field>...
- Add space character after ";" separator in multi-item <Into field> if missing...
- Remove space character after ";" separator in multi-item <Into field>...
- Replace ";" in multi-item <Into Field> with ", " but last one with " & "...
- Feat. artists and remixes
- Replace first ", " or " & " with " feat. " in <Into Field>...
- Replace ", ", " & " and/or feat./pres./vs. with "; " in <Into Field>...
- Replace ", ", " & " and/or feat./pres./vs. with "; " in <Into Field> and remove (.) if exist...
- Copy [(feat. artists]) or feat. artists from <From Field> to <Into Field>...
- Copy [(ft. artists]) or ft. artists including type from <From Field> to <Into Field>...
- Copy [(main artists]) or main artists from <From Field> to <Into Field>...
- Copy [(main & ft. artists]) or main & ft. artists from <From Field> to <Into Field>...
- Copy [(... ft. artists]) or ft. artists including type from <From Field> to <Into Field>...
- Copy [(ft.)] or ft. from <From Field> to <Into Field> replacing ", ", " & " and ft. with "; "...
- Append [(ft. artists]) or ft. artists from <From Field> to the end of <Into Field> inside (.)...
- Append [(ft.)] or ft. from <From Field> to the end of <Into Field> after separator if [(.)] exists...
- Append [(ft.]) or ft. from <From Field> to the end of <Into Field> between "prefix" and "suffix"...
- Remove [(featuring artists]) or featuring artists from <Into Field>...
- Remove [(main & ft. artists]) or main & ft. artists from <Into Field>...
- Remove [(... featuring artists]) or featuring artists from <Into Field>...
- Put featuring artists from the end of <Into Field> into ( ) parentheses...
- Put featuring artists from the end of <Into Field> between specified "prefix" and "suffix"...
- Put featuring artists and remix (if exists) in separate brackets in Title
- Add featuring artists from Artist to the end of Involved people as item with category
- Add main artists from Artist to the end of Involved people as item with category
- Remove all featuring artists from items of Involved people
- Remove all main artists from items of Involved people
- Replace (... remix/version/edit ...) with [ ... ] at the end of <Into Field>...
- Replace [... remix/version/edit ...] with ( ... ) at the end of <Into Field>...
- Assign [(... remix/version/edit ...)] from <From Field> to <Into Field>...
- Assign [( remix/version/edit )] from <From Field> to <Into Field> (version only)...
- Remove [(... remix/version/edit ...)] from <Into Field>...
- Move [(ft. artists]) or ft. artists including type from <From Field> to <Into Field>...
- Move [(ft.]) or ft. from <From Field> to <Into Field> replacing ", ", " & " and ft. with "; "...
- Move [(ft. artists]) or ft. artists from <From Field> to the end of <Into Field> inside (.)...
- Move [(ft.]) or ft. from <From Field> to the end of <Into Field> after separator if [(.)] exists...
- Move [(ft.]) or ft. from <From Field> to the end of <Into Field> between "prefix" and "suffix"...
- Lyrics and Comment
- Remove multiple blank lines from Lyrics
- Remove leading and trailing blank lines from Lyrics...
- Remove leading and trailing spaces from each line of Lyrics
- Remove timing marks from LRC Lyrics
- Replace LF with CR+LF in Lyrics
- Replace blank Lyrics with "[Instrumental]"
- Clear Lyrics greater than x line(s) but less than y lines...
- Add Artist name to special section at the start of Lyrics
- Add (Composer) to the start of Lyrics
- Remove the first line of Lyrics which already has (Composer) info
- Append "Explicit" to Comment field if Lyrics contains some explicit word
- Show media files that don't have corresponding LRC file
- Track and Disc numbers
- Assign number from the start of <From Field> to Track number...
- Assign 3-digit number from the start of <From Field> to Disc # and Track #...
- Remove Track number from the start of <Into Field>...
- Remove all digits from the start of <Into Field>...
- Remove all digits followed with " - " or ". " from the start of <Into Field>...
- Add leading zero to single-digit Track number
- Add leading zeroes to get 3-digit Track number
- Remove leading zeroes from Track number
- Add Track number to the start of <Into Field> (with leading zeroes)...
- Add Disc number and Track number to the start of <Into Field>...
- Increase Track number by +/- specified value...
- Auto-increment Track number with specified starting value (and leading zeroes)...
- Add ordinal # (increased by specified value) to the start of <Into Field> (with leading zeroes)...
- Add leading zero to single-digit number followed by " - " or ". " at the start of <Into Field>...
- Replace all digits at the start of <Into Field> (before " - " or ". ") with ordinal number...
- Replace all digits at the start of <Into Field> (before " - " or ". ") with (Disc # and) Track #...
- Assign number of tracks from the end of Track number to <Into Field>...
- Remove "/" and number of tracks from the end of Track number
- Use Disc number to create 3-digits Track number
- Assign Disc number from 3-digits Track number
- Remove first digit (disc number) from 3-digits Track number...
- Assign Disc number from [(Disc/CD nn)] from the end of Album name
- Use disc number from the end of Album name to create 3-digits Track number
- Remove disc number from the end of Album name
- Replace (Disc x) with (CD 0x) in Album name
- Append [Disc #_Track #] to <Into Field>...
- Specific manipulations
- Assign names of contained playlists to <Into Field>...
- Remove album artwork...
- Shorten first name of <Into Field>...
- Assign BPM from (nnn BPM) part of Title (not necessarily on its end)
- Remove (nnn BPM) from Title (not necessarily on its end)
- Assign Original Artist from (... cover) part of Title
- Add Mood and Tempo to the end of <Into Field>...
- Add Season # and Episode # to the start of <Into Field>...
- Add file Length surrounded by ( ) to the end of Title
- Assign date/time when file is created to Timestamp field
- Assign date/time when file is created in ISO 8601 format to <Into Field>...
- Assign Last played date/time in ISO 8601 format to <Into Field>...
- Convert date to ISO8601 format in <Into Field>...
- Add leading zero(es) to the number at the start of <Into Field>...
- Add leading zero(es) to the number at the end of <Into Field>...
- Add leading zero(es) to the leftmost number in <Into Field>...
- Add leading zero(es) to the rightmost number in <Into Field>...
- Based on related files
- Add "/" and total # of files from album to the end of Track number (with leading zeroes)...
- Add "/" and maximum Track # from disc to the end of Track number (with leading zeroes)...
- Append "prefix" (Track # "separator") total_#_of_files_from_album "suffix" to <Into Field>...
- Append "prefix" (Track # "separator") max_Track_#_from_disc "suffix" to <Into Field>...
- Make consecutive Track # for multi-disc albums using total # of files from each disc
- Make consecutive Track # for multi-disc albums using maximum Track # from each disc
- Append album length surrounded by ( ) to Album name
- Assign total song length of all files from some folder to <Into field>...
- Assign weighted average Rating of album to <Into Field>...
- Assign weighted average Track volume of album's files to Album volume
- Assign Album if it is (empty or) different from value assigned to most files from same folder...
- Assign Year if it is (undefined or) different from value assigned to most files from same album...
- Assign Genre if it is (empty or) different from value assigned to most files from same album...
- Assign Genre if it is (empty or) different from value assigned to most files from same artist...
- Assign Album Artist if it is (empty or) different from value assigned to most files from same album...
- Assign <Into Field> if it is (empty or) different from value assigned to most files from same album...
- Assign "Various Artists" to Album Artist if Album has x or more Artists, else assign Artist...
- Assign Artists from all files on Album to Album Artist sorted by number of appearances
- Assign merged Comment from all files on Album to <Into Field>...
- Append Disc number to album name only if Album contains 2 or more discs...
- Add Disc number as the last folder only if any file from album has Disc # >= 2...
- Add "Singles", Artist or Artist\Album as last folder(s) depending of # of files by Artist...
- Append weighted average Bitrate of album to the last folder of Path
- Append VBR and weighted average Bitrate of album to the last folder of Path
- Assign <Into Field> if it is empty with value from the last non-empty tagged file in list...
- Path manipulations
- Assign left-specified folder level of Path to <Into Field>...
- Assign right-specified folder level of Path to <Into Field>...
- Assign <From Field> to left-specified folder level of Path...
- Assign <From Field> to right-specified folder level of Path...
- Move prefixes to the end of left-specified folder level of Path...
- Move prefixes to the end of right-specified folder level of Path...
- Uppercase first letter of each folder/filename of Path
- Lowercase extension of Path
- Replace periods "." in Filename with spaces " "
- Remove periods from the end of Filename
- Assign the start of the last folder to <Into Field>...
- Assign "prefix" <Track#> "suffix" <Title> to Filename...
- Assign <Title> "prefix" <Artist> - <Album> "suffix" to Filename...
- Assign Track Number, Artist and Title to "IRC" styled Filename
- Append file Length surrounded by ( ) to Filename
- Add <From Field> to the start of Filename if it is not already there
- Add <From Field> to the end of Filename if it is not already there
- Remove <From Field> from the start of Filename (and add it as the last folder)...
- Remove <From Field> from the end of Filename (and add it as the last folder)...
- Remove the start of Filename (and add it as the last folder)...
- Remove the end of Filename (and add it as the last folder)...
- Remove Artist name or Track number from the start of Filename...
- Move files to Temp folder
- Move files to ?:\specified_folder\<Genre>\<Album Artist>\<Album>\<Track#:2> - <Title>.ext...
- Move files using specified mask...
- Spelling and case fixes
- Fix common words (featuring, presents, versus) in <Into Field>...
- Fix common words (I'm, I'll, don't, won't, ain't, isn't, can't) in <Into Field>...
- Fix specified Artist names (10cc, AC/DC, INXS, UB40)
- Fix <Into Field> with styles entered from All Music Guide
- Fix Napster file tagging, e.g. The Way It Is (Mix) [Mix]/Mix -> The Way It Is (Mix)
- Capitalize <Into Field> (ASCII, Latin-1, Latin-2 & Cyrillic)...
- Capitalize <Into Field> with exceptions (ASCII, Latin-1, Latin-2 & Cyrillic)...
- Lowercase Single, Edit, Remix or Mix in the <Into field>...
- Uppercase first letter of <Into Field> and lowercase others...
- Uppercase only first letter of <Into Field>, others unchanged...
- Uppercase first letter of each line or sentence of Lyrics and lowercase others
- Uppercase first letter of each line or sentence of Lyrics with exceptions
- Uppercase English "I" and first letter of each line or sentence of Lyrics
- Uppercase only first letter of each line or sentence of Lyrics, others unchanged
- Uppercase roman numerals in <Into Field> if followed by a dot...
- Unicode conversions
- Remove diacritical marks from <Into Field> (aeiou)...
- Remove diacritical marks from <Into Field> (cdghjklnrstywz)...
- Remove diacritical marks from <Into Field> (aeioucdghjklnrstywz)...
- Replace all Unicode non-ANSI characters with "-" in Filename
- Convert Cyrillic (Windows-1251) to Unicode in <Into Field>...
- Convert Cyrillic Unicode to Windows-1251 in <Into Field>...
- Transliterations
- Convert Serbian Latin to Serbian Cyrillic in <Into Field>...
- Convert Serbian Cyrillic to Serbian Latin in <Into Field>...
- Convert Latin to Russian Cyrillic in <Into Field>...
- Convert Russian Cyrillic to Latin in <Into Field>...
- Convert Latin to Greek in <Into Field>...
- Convert Greek to Latin in <Into Field>...
- Inverted mode
- Assign <From Field> to <Into Field> with moved prefixes to the end (Alt)...
- Assign <From Field> to <Into Field> with moved prefixes to the start (Alt)...
- Assign <From Field> to <Into Field> with swapped first and last name and added ", " (Alt)...
- Assign <From Field> to <Into Field> with swapped last and first name and removed ", " (Alt)...
- Assign the start of <From Field> before leftmost specified string to <Into Field> (only if exists) (Alt)...
- Assign the end of <From Field> after rightmost specified string to <Into Field> (only if exists) (Alt)...
- Assign (the start) of <From Field> to <Into Field> (only if exists) (Alt)...
- Assign (the end) of <From Field> to <Into Field> (only if exists) (Alt)...
- Move specified number of words from the start of <From Field> to <Into Field> (Alt)...
- Move specified number of words from the end of <From Field> to <Into Field> (Alt)...
- Show/Select findings
- Show files from Artists that start with the same specified number of words...
- Show files with <Into Field> that start with lowercase letter...
- Show files with <Into Field> that end with uppercase letter...
- Show files with <Into Field> that start with "prefix" number "suffix"...
- Show files with <Into Field> that end with "prefix" number "suffix"...
- Show files that have specified string at the start of <Into Field>...
- Show files that don't have specified string at the start of <Into Field>...
- Show files that have specified string at the end of <Into Field>...
- Show files that don't have specified string at the end of <Into Field>...
- Show files with featuring artists in <Into Field>...
- Select feat. artists from the end of <Into Field> outside of brackets...
- Batch presets
- Show files with feat. artists in Title & select non-enclosed with brackets
- Show files with featuring artists in <Into Field> (Batch)...
- Select feat. artists from the end of <Into Field> outside of brackets (Batch)...
- Move [(ft. artists]) or ft. artists from Title to the end of Artist
- Copy [(ft. artists]) or ft. artists from <From Field> to the end of <Into Field> (Batch)...
- Remove [(featuring artists]) or featuring artists from <Into Field> (Batch)...
- Show files with feat. artists in Title & select non-enclosed with brackets
If you are interested in my other add-ons for MediaMonkey, you could visit the following page.