This is information about the enhanced version of Export/Import Playlists add-on for MediaMonkey v2.x-4.x. The freely available version of this add-on is already one of the largest MediaMonkeys add-ons that is the most flexible for exporting playlist files and creating playlists. However, the enhanced version is two times larger and it has added many very useful options; among others it allows import of M3U playlist files to MediaMonkey playlists with searching for similar media files already added to the Library, which enables transfer of playlists to another computer.
- v6.0 - 2021-02-16
- Added: import of ASX and XSPF files; import of M3U and M3U8 files doesn't require M3U node from the My Computer branch to be selected with the new "Import Playlist File(s) *" commands;
- Added: command Export Playlists Node to Playlist Files for saving the whole Playlists branch from the Media Tree panel as playlist files without need for Playlists node to be selected;
- Renamed: command Export to M3U/ASX/XSPF Playlist to Export Selected Node as Playlist File;
- Renamed: command Export As Playlist File to Selected Folder to Export Selected Node to Same Folder;
- Renamed: command Export to Playlist File & Copy Media Files to Export Selected Node & Copy Media Files;
- Renamed: command Export Child Nodes As Playlist Files to Same Folders to Export Child Nodes to Same Folders;
- Renamed: command Export Child Nodes to Playlist Files & Copy Media Files to Export Child Nodes & Copy Media Files;
- Renamed: command Export M3U Playlists in Child Nodes to Same Folders to Export M3U Playlists to Same Folders;
- Added: command Import Playlist Files to Playlists Node for importing playlist files (M3U, M3U8, ASX or XSPF) from the specified base folder to the Playlists branch in the Media Tree panel;
- Added: command Import Playlist File to Selected Playlist for importing a specified playlist file (M3U, M3U8, ASX or XSPF) to the playlist selected in the Media Tree panel;
- Added: command Import Playlist File to Playlist for importing a specified playlist file (M3U, M3U8, ASX or XSPF) to the playlist selected in menu;
- Added: command Import Playlist Files in Child Folders for importing the playlist files (M3U, M3U8, ASX or XSPF) from a specified folder (and its sub-folders) to the base playlist selected in the Media Tree panel;
- Added: command Import Playlist Files to Playlists for importing the playlist files (M3U, M3U8, ASX or XSPF) from a specified folder (and its sub-folders) to the base playlist selected in menu;
- Renamed: command Import to Playlist to Import Selected Node to Playlist;
- Added: Customize dialog box for visibility settings of the menu commands;
- Renamed: option Parent level to Into parent level, and inverted its old effect on export;
- Added: the additional .ini keys RemoveChildPlistsMode, UseAutoPlistsSameNameMode and OverUnmodifiedPlsFiles;
- Fixed: error on import of too many files in some occasions;
- Fixed: extension of exported M3U files in UTF-8 format to the .M3U8;
- Fixed: resizing of the Options dialog box with the skinned version of the program on Windows Vista and later;
- Improved: all "* M3U Playlists *" commands from the menu are now always enabled and don't require a node from the My Computer branch to be selected; however, these commands are inferior to the newly added "* Playlist File(s) *" commands and they are kept only if a newly added command fails from an unknown reason.
- v5.4.1 - 2019-11-22
- Fixed: removal of the old playlist files on export of the corresponding empty playlists when the option Skip export/import of - Empty playlists is turned on;
- Fixed: missing Export/Import Playlists item from the tree pop-up menu in some rare cases.
- v5.4 - 2018-06-11
- Added: command Export to Playlist File & Copy Media Files to all relevant menus (the tree and filelist pop-ups, File menu, ...), which is similar to the existing Export Child Nodes to Playlist Files & Copy Media Files, but it is applied only on the selected node/files;
- Added: ability to use Replace/With settings from the Options dialog box to set mappings between media files and copied ones when using commands from the menu that have "Copy Media Files" in their name (until now it was possible to set mappings only with the option Use mask for specifying paths);
- Added: ability to copy Album Art in external files together with the corresponding media files if they are in the same folders (which could be disabled using the additional .ini key CopyAlbumArtFiles);
- Added: confirmation before applying any "Copy Media Files" command (which could be disabled using the additional .ini key CopyMediaFilesConfirmed);
- Added: message when it is not possible to copy media file when using a "* Copy Media Files" command for whatever reason, e.g. wrong Replace/With strings (which could be disabled with IgnoreFileErrors key);
- Fixed: coping of media files with the option Use masks when the target folders don't exist;
- Added: ability to use Replace and Relative options at the same time, but the path replaced by Replace option should be appropriate for getting its relative form;
- Fixed: URL and Unix options used together with the Replace option in some specific cases;
- Improved: speed of import when using the Replace option in some cases.
- v5.3.6 - 2017-02-22
- Fixed: 100% CPU and program crash with When any playlist is added or modified option with some auto-playlists;
- Improved: automatic export with When any playlist... option, e.g. all playlists are not auto-exported after first modification of some playlist after startup, but only that modified playlist.
- v5.3.5 - 2017-01-24
- Fixed: Replace - Paths in playlist files option to allow multiple replacements per file, e.g. if you specify L:\Music\".flac in the Replace text box and ..\Music\".mp3 in the With text box, you will get replaced L:\Music\ with ..\Music\ and/or .flac with .mp3, even for the same files;
- Fixed: error which sometimes happens when trying to import .m3u files while automatic export every x minutes is already enabled (manual import or export is still not recommended at the same time with automatic export every x minutes, especially because they share many of their settings).
- v5.3.4 - 2016-10-02
- Fixed: error when trying to replace paths in playlist files with empty string (broken in v5.1).
- v5.3.3 - 2016-04-21
- Fixed: export of playlists with the same names within the same parent playlist when modifying them if the automatic export is set with the When any playlist is added or modified option;
- Fixed: error on replacing multiple paths in playlist files (broken in v5.3).
- v5.3.2 - 2015-11-11
- Fixed/Improved: automatic export with When any playlist is added or modified option.
- v5.3.1 - 2015-10-31
- Fixed: error with Import Child Nodes to Playlists and Import M3U Playlists from Child Nodes commands (broken in v5.3).
- v5.3 - 2015-10-08
- Added: Skip export/import of - Empty playlists option which allows export of empty playlist files (even if the source folders don't contain any available file) or import of empty folders into the Playlists branch creating empty playlists;
- Added: Delete all playlist files in target folder(s) before each export option which removes all playlist files from the specified target folder and/or its sub-folders recursively (depending of your settings in the add-on's Options dialog box). If this option is turned on, the playlists files will be removed on each export, automatic or manual, so please be extremely careful when using it!
The new control for this option has taken place instead of the Exclude files - With extension text box because of the lack in space in the already overcrowded Options dialog box; it seems that nobody used that option anyway, but if you really need a possibility to exclude some extensions from export, then you could create some collection with excluded such files to get the same effect. Of course, the related Ini keys are still in effect (SkipExportExtensions and SkipListExtensions) so you will be able to use it by manual editing of the Ini file, like many other Ini keys of this add-on that don't have corresponding GUI options (more about them in the Additional INI keys section). - Added: a hot-key for Export to M3U/ASX/XSPF Playlist commands which is Shift+Ctrl+E by default, but you may modify it using the ExportFilesToM3UHotkey key in the ExportM3UsForChildNodes section of the MediaMonkey.ini file;
- Added: ability to import files/nodes to static playlists that are children of auto-playlists;
- Fixed: settings of playlist for automatic export with non-skinned program (broken in 4.0).
- v5.2 - 2015-06-06
- Added: Join folder levels option which allows export to the single folder using only captions of the corresponding nodes; if that option is turned on, the behavior would be as before using captions of all parent nodes as well. For example, if I have the following tree branch:
- Rock
- Pink Floyd
- Dark Side of the Moon
- Wish You Were Here
- Pink Floyd
- Rock
- Renamed: Split check box to Split folder levels that is enabled when To nested folders/playlists is selected; the same check box is using for Join folder levels option if To single folder/playlist is selected.
- v5.1 - 2015-01-21
- Added: possibility to replace two or more paths with the same number of another paths using " (double quote) as a separator between paths (only when the Use mask for specifying paths option is turned off), applicable both for export and import.
For example, if you enter Replace: i:\music\artists\"i:\music\soundtrack\ and With: TF1:\music\"TF2:\music\ then you will get replaced i:\music\artists\ with TF1:\music\ and i:\music\soundtrack\ will be replaced with TF2:\music\ (although you could write it as Replace: "i:\music\artists\", "i:\music\soundtrack\" and With: "TF1:\music\", "TF2:\music\").
If you want to replace two or more paths with single path then use the | separator in the Replace string as it was the case with the previous versions of the add-on, e.g. if you enter Replace: i:\music\artists\"i:\music\soundtrack\|I:\Music\Genre\ and With: TF1:\music\"TF2:\music\ then you will get replaced both i:\music\soundtrack\ and I:\Music\Genre\ paths with TF2:\music\. - v5.0 - 2014-05-14
- Improved: Import Playlists for Child Nodes command (instead of the old Create Playlists for Child Nodes one) which allows adding the media files specified in M3U playlist files from the selected My Computer folder and/or its sub-folders (depending of the settings in the Options dialog box) to the Library, even if the referenced media files don't exist physically on the disk;
- Added: Import to Playlist command for importing a single folder (if the command is selected in the tree's context menu) or importing of selected files (if it is selected in the filelist's context menu) to the specified MM playlist;
- Added: Import M3U Playlists from Child Nodes command for importing only M3U files from My Computer branch to the specified MM playlist;
- Improved: Replace - Paths in playlist files option could be used on import of files as well, not only on export (actually, paths are not directly replaced in playlist files themselves, but the media files are importing from the paths in playlists files that are replaced, which is useful if paths in playlist files don't point to the exact drives/folders);
- Added: option to use MM masks for replacing paths in playlist files, both for export and import (requires MM v4.1.0.1662 or higher);
- Added: option for automatic export of MM playlists when they are modified, renamed, moved or added to the Playlists branch (requires MM v4.1.0.1648 or higher);
- Added: option for automatic removal of exported playlist files when corresponding MM playlists are removed from the Playlists branch (requires MM v4.1.0.1648 or higher);
- Added: Split option that allows export/import with captions of M3U nodes in My Computer parsed into corresponding nested levels of folders/playlists using specified Level separator (which is kind of opposite to saving playlists to the single folder using the same separator);
- Changed: To parent folders and To child folders options are replaced with To nested folders/playlists option and Parent level check box.
- For MediaMonkey 3.0 or higher - just double-click on the ExportM3UsForSubNodes-xx.mmip file; if you are on Vista or newer Windows and you got "Product installation error", make sure you have MM3 set to "Run as Administrator"; if you downloaded the installation package with IE7 and it changed its extension to a .zip, you should first change it back to a .mmip.
- For MediaMonkey 2.x - rename a .mmip extension to a .zip, extract the ExportM3UsForSubNodes.vbs file to the MediaMonkey's "Scripts\Auto" folder and restart MM program.
Using this add-on is quite similar to the older Export/Create Playlists version. This add-on has three main modes of work: manual and automatic export and manual import. The manual operations could be started from the menu, while the automatic mode is working in the background on a timely basis that is set in the Options dialog box.
Menu
The commands of this add-on are located in the Export/Import Playlists sub-menu in the File menu and the context menus of the Media Tree, the main filelist and Now Playing panel.
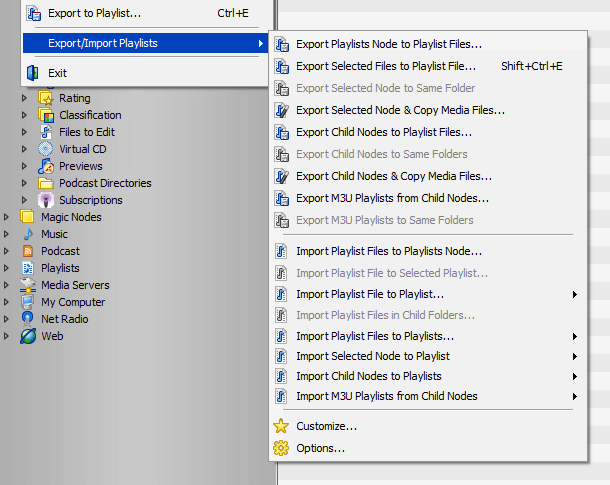 |  |
First of all, you need to understand the difference between the playlist files and the MediaMonkey playlists (or shorter "playlists"): the playlist files are the lists of media files stored in M3U, ASX or XSPF files, while the playlists are the lists of media files stored in the MediaMonkey database and visually represented inside of the Playlists folder of the Media Tree panel.
The Export/Import Playlists add-on could export list of media files to the playlist file(s) using some of the Export commands from its menu, or it could import list of media files to the MM playlist(s) using some of the Import commands from the menu. The Export commands could be seen as an extension to the built-in Send to / M3U/XSPF playlist menu command, while the Import commands could be seen as some kind of extension to the built-in Send to / Playlist menu command. The main advantage of this add-on over the mentioned built-in commands is that it allows export/import of all child nodes of the selected node.
The commands in the File menu and the context menu of the Media Tree are mostly applicable on the node selected in the tree panel, e.g. you could get exported/imported all media files of the selected node and/or its sub-nodes (depending of your settings in the add-on's Options dialog box). The following commands are available:
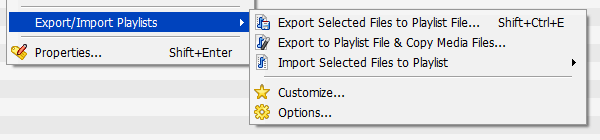
The context menu of the main filelist and Now Playing panel contains a reduced set of commands from the File menu / the context menu of the Media Tree, and these commands could export/import only files selected in the filelist/Now Playing panel. The following commands are available:

Export/Import Playlists for Child Nodes Options
The add-on settings are located in the Options dialog box which you could get: 1) if you choose any of the mentioned Options commands in the Export/Import Playlists sub-menu of the File menu and the context menus of the Media Tree, the main filelist and Now Playing panel, or 2) if you select Export/Import Playlists add-on in the Tools / Extensions dialog box and click on the Options button, or 3) if you select the General / Export/Import Playlists sheet in the Tools / Options dialog box.
Many of the settings in the Options dialog box are common for all three main modes of work: manual and automatic export and manual import. It will be noted if an option is applicable only for one specific mode.

Export/Import Source
In the first group of controls on that dialog we could specify what we want to export/import if we choose any command from the menu that affects the sub-nodes, e.g. Export Child Nodes as Playlist Files... or any other command that contains "Child Nodes" in its name. If the Selected node option is turned off then only sub-nodes of the selected node would be exported/imported, while if it is turned on the selected node would be exported/imported as well. With the next 3 options we could choose which levels of sub-nodes we want to export/import: the first level, the last level or all levels.
Let say, for example, that I have the following tree branch and that I have selected the Rock node:
- Rock
- Pink Floyd
- Dark Side of the Moon
- Wish You Were Here
Export/Import Destination
With the second group of options we could specify where and how we want to store the playlist files/playlists: to the nested folders/playlists (hierarchically structured) or to the single folder/playlist. If we select nested folders/playlists we could also choose if we want to store playlist files/playlists to the folders/playlists with the same names as the source folders or to their parent folders/playlists.
The settings in this group have only effect with the "Child Nodes" commands with the "..." on the end of a name, e.g. Export Child Nodes as Playlist Files..., i.e. the commands that allow us to specify some arbitrary target folder (on export). However, those settings are ignored with the "Child Nodes" commands with the "to Same Folders" text on the end of a name, e.g. Export Child Nodes to Same Folders, since in that case the playlist files are always stored to the same folders with the media files.
Here is the same example of the "Rock" branch with the previously ticked All levels of sub-nodes option. If I have To nested folders/plists turned on and Into parent level turned off, I will get "Pink Floyd" playlist file in the specified target folder and "Dark Side of the Moon" and "Wish You Were Here" playlist files in the "Pink Floyd" sub-folder of that specified folder. If I have Into parent level turned on, I will get "Pink Floyd" playlist file in the "Pink Floyd" sub-folder of the specified folder, "Dark Side of the Moon" playlist file in the "Dark Side of the Moon" sub-folder of the "Pink Floyd" folder and "Wish You Were Here" playlist file in the "Wish You Were Here" sub-folder of the "Pink Floyd" folder.
Finally, If I have To single folder/playlist and Join folder levels turned on with the " - " specified as a separator, I will get all files in the specified folder, i.e. I will get "Pink Floyd", "Pink Floyd - Dark Side of the Moon" and "Pink Floyd - Wish You Were Here" playlist files in the same folder.
The next command in this group has two meanings depending of the previous ones. If we choose To nested folders/plists, it will be named as Split folder levels which allows export/import with captions of M3U nodes in My Computer branch parsed into corresponding nested levels of folders/playlists using specified separator (which is kind of opposite to saving playlists to the single folder using the same separator); the Split folder levels option doesn't parse captions of regular folders, but only captions of M3U nodes.
If we choose To single folder/playlist, the same command will be named as Join folder levels which allows export to the single folder using captions of the current node and all its parent nodes. However, if it is turned off, only captions of the corresponding nodes will be used. For example, if I have the previously mentioned tree branch and if I choose To single folder/playlist, with the Join folder levels option turned off I will get: "Dark Side of the Moon.m3u" and "Wish You Were Here.m3u" files, but if I turn it on I will get "Pink Floyd - Dark Side of the Moon.m3u" and "Pink Floyd - Wish You Were Here.m3u" files.
Those last examples are such that if I have the Selected node option turned off. However, if I turn that option on, I will get one additional, "Rock" sub-folder in the specified folder and inside of it there will be created folders mentioned in the previous two examples with To nested folders/plists option. If I choose To single folder/playlist with the Selected node option turned on, then I will get "Rock - Pink Floyd", "Rock - Pink Floyd - Dark Side of the Moon" and "Rock - Pink Floyd - Wish You Were Here" playlist files in the specified folder (the "Rock - " is added on the beginning of the previous To single folder/playlist examples).
Export File Format
Many commands from the Options dialog box are common both for export and import, but the next two group of commands are applicable only on export. With the third group of options we could specify the format of the exported playlist files: .m3u/.m3u8, .asx or .xspf. If we choose export to the M3U format, with the #EXT option we could further specify the format of the exported .m3u files. If that option is turned off, we will get the so-called Simple M3U format, i.e. .m3u files will have only list of paths to the media files, e.g.:
c:\My Music\Rock\Pink Floyd\Dark Side of the Moon\01 - Speak to Me; Breathe in the Air.mp3
c:\My Music\Rock\Pink Floyd\Dark Side of the Moon\02 - On the Run.mp3
However, if the #EXT option is turned on, we will get the Extended M3U format, with the additional information about each included media file, which helps faster display of the added/opened playlists in many players, but some another players don't support such extended M3U format:
#EXTM3U
#EXTINF:240,Pink Floyd - Speak to Me; Breathe in the Air
c:\My Music\Rock\Pink Floyd\Dark Side of the Moon\01 - Speak to Me; Breathe in the Air.mp3
#EXTINF:213,Pink Floyd - On the Run
c:\My Music\Rock\Pink Floyd\Dark Side of the Moon\02 - On the Run.mp3
The fourth group of options determines encoding format of the exported playlist files: ANSI, UTF-8 and Unicode (UTF-16). You should choose UTF-8 or Unicode if you have non-ANSI characters in your paths of audio files, e.g. Cyrillic, but you should first check if such files are supported with your media player. If you choose UTF-8 format you could specify if playlist files should have BOM characters. A byte-order mark (BOM) is the invisible Unicode character placed at the begin of the file, it is used as a marker to indicate that text is encoded in UTF-8; you should uncheck this option if you have a player that cannot read files with a BOM. By the way, if you modify some playlist file in UTF-8 format using Notepad, it will save that file with added BOM always. M3U files saved in UTF-8 will have the .m3u8 extension.

Skip/Exclude/Remove
The next group of options determines what we want to skip/exclude from the export/import. We could skip: empty playlists (when the source folders don't contain any available media file), M3U nodes from My Computer branch of the Media Tree, "All" nodes from My Computer, Location and Magic Nodes branches, Autoplaylists from the Playlists branch and nodes/folders with the specified name(s). The names of folders could be specified using regular expressions if that option is turned on, but even if we don't use regular expressions we could specify several names of nodes/folders for skipping using the vertical line "|" as a separator.
If a named folder is skipped during the export, then all its sub-folders would be skipped as well. The sub-nodes of "All" nodes from the Location branch are skipped by design even if you turn off skipping of "All" nodes. The M3U and "All" nodes from My Computer branch don't have sub-nodes anyway. The Skip export/import of - M3U nodes option is ignored if we choose Export M3U Playlists from Child Nodes, Export M3U Playlists to Same Folders or Import M3U Playlists from Child Nodes command from the menu. The last (rightmost) level of "All" nodes in My Computer branch could be skipped using the SkipLastAllNodes INI key to get consistent behavior with the "All" nodes from the Location branch, which will be explained later in the Additional INI keys section. Also, the export of sub-nodes of Autoplaylists depends of the SkipAutoPlsSubNodes INI key which will be explained later.
The exported playlist files and imported playlists could contain only the media files that are displayed in the filelist for each corresponding source node. However, sometimes those displayed media files could be unavailable or inaccessible, e.g. after upgrading the hard disk. With the Exclude unavailable files option we could specify that such media files should be omitted from the playlists during the export/import. However, if we turn this option off, the unavailable files will be exported/imported with the same paths and other metadata that are visible in the filelist of their source nodes (if the source nodes are M3U playlists, the unavailable imported files will contain only Path and Title, and probably Artist, but nothing more, not even File Length).
The last option in this group is Delete all playlist files in target folder(s) before each export and it could be used to remove all playlist files from the specified target folder and/or its sub-folders recursively (depending of the other settings in the Options dialog box). If you choose To nested folders/plists, the playlist files from the specified target folder and all its sub-folders will be removed recursively, but if you choose To single folder/playlist only the playlist files in the specified target folder will be removed. If this option is turned on, the playlists files will be removed on each export, automatic or manual, so please be extremely careful when using it!
This option has the similar effect as the option Delete exported file if its playlist is deleted (more about it later), but there are several important differences: this one deletes absolutely all playlist files, it works on each type of export, manual or automatic (excluding automatic export using When any playlist is added or modified), and it works with all versions of MediaMonkey, while the latter option deletes only playlist file which has the corresponding playlist just deleted from the Media Tree, also that one works only if the option When any playlist is added or modified is turned on and it is limited on the 4.1.0.1648 version of MediaMonkey or newer.

Format of Paths in Playlist Files (and Destination for Copied Media Files)
The next group of options determines how the paths of media files will be stored in the playlist files on the export, but some of them are applicable during import as well. Also, some options could be used to set the mapping of the media files to the copied files when using the "... Copy Media Files" commands from the menu, i.e. to set the destination folders for copied media files.
With the Relative option we could choose if we want paths in playlist files in relative or absolute format. The absolute paths represents the full paths to the media files as you could see from the previous examples for the Extended .m3u format. The relative paths represents paths of the media files relative to the path of the playlist file. For example, if I choose export to the parent level of folders, I would get "Dark Side of the Moon" playlist file with relative paths as:
Dark Side of the Moon\01 - Speak to Me; Breathe in the Air.mp3
Dark Side of the Moon\02 - On the Run.mp3
The relative paths could help if you have different paths on the source and destination computers/players (e.g. different absolute paths c:\My Music\Rock\Pink Floyd\Dark Side of the Moon\02 - On the Run.mp3 on the computer and e:\Music\Rock\Pink Floyd\Dark Side of the Moon\02 - On the Run.mp3 on the player have the same relative path Dark Side of the Moon\02 - On the Run.mp3), but some players don't support them, so you should check on first if you could use that option. You should export playlist files to the same drive with media files, otherwise the relative paths cannot be determined and the absolute paths will be exported instead.
With the URL (file://) option we could choose another format for paths in playlist files. If I turn that option on, with the previous example I will get:
file:///c:/My%20Music/Rock/Pink%20Floyd/Dark%20Side%20of%20the%20Moon/01%20-%20Speak%20to%20Me%3B%20Breathe%20in%20the%20Air.mp3
file:///c:/My%20Music/Rock/Pink%20Floyd/Dark%20Side%20of%20the%20Moon/02%20-%20On%20the%20Run.mp3
There is a small number of players that require playlist files with such paths, so most probably you will not need that option.
With the Short (8.3) option we could get paths in the old DOS format that are required on some players. That option works only with the existing files, so the Exclude unavailable files option should be turned on for it. Also, it is not possible to use URL and Short paths at the same time. If this option is turned on, then all parts of the path will be stored using such short form, i.e. each folder and filename. For example, with the following full path:
D:\Music FLAC\Kurt Masur; New York Philharmonic Orchestra\Dvořák; Symphony #9, Slavonic Dances\01 Dvořák_ Symphony #9 In E Minor, O.flac
we will get:
D:\MUSICF~1\KURTMA~1\DVOK_S~1\01DVOK~1.FLA
However, some players like Logitech Media Server (LMS) require short form only for folders/filenames with non-ANSI characters, like this:
D:\Music FLAC\Kurt Masur; New York Philharmonic Orchestra\DVOK_S~1\01DVOK~1.FLA
So, in that case to get such paths you should turn on ANSI file format and turn off Short (8.3) paths.
With the Unix ("/", LF) option we could also specify format for paths in the playlist files. If your media player has some Unix variation as Linux for its OS, you should turn that option on. In that case the paths of media files will have the "/" separator between folders instead of "\", and the new lines will be represented with the LF character instead of CR+LF as it is in Windows.
With the Replace and With options we could replace parts of paths with another string in almost same way as we could do it in e.g. Notepad using its Replace option (well, maybe as with EditPad or similar advanced text editor which also supports Regular expressions). Within the Replace text box you could specify string which you want to replace and with the second, With text box you could specify string for replacement. You could also use the "..." buttons to specify paths, but only if you want to replace one folder with some another. For example, "c:\Documents and Settings\My Name\My Music\" could be replaced with "e:\Multimedia\Music\".
You could use the "..." buttons on the right side of the Replace and With combo boxes to select the wanted folders, but you could also type paths or their patterns manually. In that case it is possible to specify two or more paths that will be replaced with the same number of another paths using " (double quote) as a separator between paths (only when the Use mask for specifying paths option is turned off), which is applicable both for export and import.
For example, if you enter Replace: i:\music\artists\"i:\music\soundtrack\ and With: TF1:\music\"TF2:\music\ then you will get replaced i:\music\artists\ with TF1:\music\ and i:\music\soundtrack\ will be replaced with TF2:\music\ (although you could write it also as Replace: "i:\music\artists\", "i:\music\soundtrack\" and With: "TF1:\music\", "TF2:\music\").
If you want to replace two or more paths with the single path then use the | separator in the Replace string, e.g. if you enter Replace: i:\music\artists\"i:\music\soundtrack\|I:\Music\Genre\ and With: TF1:\music\"TF2:\music\ then you will get replaced both i:\music\soundtrack\ and I:\Music\Genre\ paths with TF2:\music\.
With the Use Regular expressions for specifying paths/folders option we could specify even more complex patterns for replacement, e.g. we could replace several different paths with the single one at once. For example, the "^.+\\(?=[^\\]+\.[^\.\\]+$)" string is the expression which represents any full path, excluding the filename and the extension. So, using that expression, if you leave the With text box empty, all folders will be removed from the paths, saving only the filenames and extensions into the playlist files. Or, you could enter "e:\Music\" in the With text box, and all folders will be replaced with that single one. Although, you should turn on the Regular expressions only if you know how to use them.
The Use Regular expressions option has the effect on both Replace - Paths in playlist files and Skip export/import of - Folders options, i.e. you cannot use the regular expressions for the first option and don't use them for the second option, and vice versa.
The Use mask for specifying paths option allows using of MediaMonkey's masks for replacing paths in playlist files, both for export and import, but it requires MM v4.1.0.1662 or higher.
The Replace and With options could be used on import of files as well, not only on export, which is useful if the paths of media files in the imported M3U nodes don't point to the exact drives/folders (more about it in the guide How to: Import M3U files).
The Replace option, together with the With, Use Regular expressions and/or Use mask for specifying paths options, could be used to set a mapping of the media files to the copied files when using the "... Copy Media Files" commands from the menu, i.e. to set the destination folders for copied media files.
The same destination folders for the copied files will be used in the path references in the playlist files, which is a limiting factor if you plan to copy media files to a portable media player whose internal software has a different drive letter than Windows. In that case you could try with the relative paths. The guide How to: Export playlist files and copy related media files to different folders contains one example how to use the Replace option when copying media files.

Automatic Export of Playlists
The next group of remaining controls on the Options dialog box is used only for automatic export of the specified MM playlist(s) to the playlist files. We could choose when the playlists should be exported: On startup, On shutdown and/or Every xx minute(s).
With the MM v4.1.0.1648 or higher it is also possible to automatically export MM playlists from the Playlists branch whenever they are added, renamed, moved or modified (e.g. any file is added/removed to/from the playlist or you changed order of files within playlist) using the When any playlist is added or modified option. If that option is turned on, then it is possible to use the next Delete exported file if its playlist is deleted option as well. It allows automatic removal of the exported playlist files when the corresponding MM playlists are removed from the Playlists branch.
We could choose a playlist which should be automatically exported (altogether with its sub-playlists) using the From dropdown list. Only playlists from the first level in the Playlists branch could be directly selected from that list, but any nested playlist could be also specified using "\" as a separator between sub-levels. It is even possible to specify the name of a nested playlist without its full path, but only if that name is unique. Within the To text box we should specify the folder where we want to get exported playlist file(s). Its usage is similar to the target folder specified after any "Child Nodes" command is chosen from the menu for the manual export.
With the option Create new child folder with a dated name we could specify if we want automatically exported playlist files in the separated folders with dates in their names, which would be within the folder specified in the To text box. If the option For every auto-export is turned on, the dated folders with the playlist files will be created whenever the condition for automatic export is satisfied, e.g. if Every xx minutes is chosen then every specified minutes would be created a new folder. If the Once in a day option is turned on, the folders with dates in their names will be created only once each day.
How to: Export static playlists to the custom-defined structure of folders
This add-on has only two possibilities for target folders of the exported playlist files: 1) it could store them all in a single folder, or 2) it could export them to the hierarchically organized folders using the same structure as the sub-nodes of the selected node. So, if you select a node for export which doesn't have sub-nodes, you will get only one playlist file corresponding to that node, even if you choose To nested folders/plists option.However, if you want to get the playlist files exported to a different folder structure than you have it with the existing nodes, there is a workaround for that using Magic Nodes add-on. Let say that you want to export one node from the Playlists branch of the Media Tree to the multiple playlist files saved in the d:\Playlists\<Album Artist>\<Album> structure of folders:
The references to the media files inside of the playlist files will have the same paths as you have them in your Library. However, you could use some of the Replace options in the Export/Import Playlists Options dialog box to change them. For example, you could turn on the option Use mask for specifying paths and type d:\Music\<Album Artist>\<Album>\<Filename>.<Extension> in the Replace text box if you have a copy of media files in the target d:\Music\* sub-folders.
How to: Export playlist files and copy related media files to different folders
Here are the three important things that you should know about this add-on:1. you could select the target base folder for playlist files using the Select Folder dialog box that you get after you choose export with any "Child Nodes" command from the menu;
2. you could set the structure of the target sub-folder(s) for playlist files that will be inside the selected base folder using the To nested folders and To single folder options in the Options dialog box;
3. if you use any "Copy Media Files" command from the menu, you could set the the target base folder and structure of its sub-folders for copies of the media files using the Replace options from the Options dialog box.
So, when you use some of the "Copy Media Files" commands from the menu, if you have the Replace option turned off in the Options dialog box, the media files will be copied to the same folder(s) with the exported playlist file(s).
However, if you want to copy media files to the deferent folders than playlist files, you could use the Replace option, together with the With, Use Regular expressions and/or Use mask for specifying paths options, to set a mapping of the media files to the copied files, i.e. to set the destination folders for copied media files. Let say that you want to copy all media files contained in one node of the Media Tree to the d:\Music\<Album Artist>\<Album> folders:
After that, you will get the playlist file in the d:\Playlists folder and copied media files in the sub-folders of d:\Music. The references to the media files inside the playlist file will have the same d:\Music base folder. However, if you copied the media files to a portable media player whose internal software has a different drive letter than d:, you could try the same process but with the enabled relative paths using the Relative option.
How to: Update location of media files in M3U playlist files
When you upgrade your hard disk and/or transfer your media and playlist files to the new disk, if you decide to use different drive letter and/or base folder, you will get the playlist files with wrong references to the media files and those playlist files will be unplayable. However, you could update location of media files in these playlist files if they are in M3U format using this add-on:How to: Change format of M3U playlist files
If you want to save existing M3U files as ASX or XSPF, or if you want to convert M3U files from the simple format to the extended one (or vice versa), or if you want to change the relative paths of media files referenced in M3U files to the absolute ones (or vice versa), or if you want any other kind of conversion, you could use the similar approach as in the previous section:How to: Transfer playlists to another computer
Here is the short guide how to transfer MediaMonkey's playlists from one to another computer. Firstly, you should know that you could use this add-on to transfer only static playlists, as it is mentioned in the Limitations section. Secondly, you need to have MediaMonkey and this add-on installed on both computers. Thirdly, the media files on both computers should be within the similar folder structure, only their base folders could be different (e.g. files could be stored on the first computer in "c:\Documents and Settings\My Name\My Music\" and on the second "e:\Music\").- export only particular playlist (and its sub-playlists): select that playlist in the Playlists branch of the Media Tree (if you select the Playlists node, you will get exported all sub-playlists) and choose Export Child Nodes as Playlists from the context menu;
- export all playlists from the Playlists branch: just choose Export Playlists Node to Playlist Files from the menu, it doesn't matter what node is selected;
- import playlist files to a particular playlist in the Playlists branch: choose Import Playlist Files to Playlists and select target playlist in the menu, or select that playlist in the Media Tree and choose Import Playlist Files in Child Folders from the context menu;
- import playlist files as direct children of the Playlists branch in the Media Tree panel: just choose Import Playlist Files to Playlists Node from the menu, it doesn't matter what node is selected;
As you could see, the most settings in the Options dialog box are (and should be) similar on both computers.
Here is a more detailed explanation how you could use this version of the add-on to import playlist files into MediaMonkey playlists.
First of all, for many import menu commands you need to have the Media Tree displayed (set in View menu). Then you should set accordingly the related options on the Export/Import Playlists page in the Options dialog box. For example, you should choose the All level of sub-nodes option if you want to import M3U files that are located in the nested folders, also turn on the option To nested folders/playlists for the same reason.
You should turn on the Into parent level option ONLY if you want to store media files referenced in your playlist files to the parent playlists of the corresponding playlist files (having the same names). However, if you want to get the same structure and the content of the playlists as they are in the corresponding playlist files, then you should have that option turned off. Let say, for example, that I have the following structure on disk and that I have selected the Rock folder:
- Rock
- Pink Floyd
- Dark Side of the Moon.m3u
- Wish You Were Here.m3u
- Pink Floyd
- Test
- Rock
- Pink Floyd
- Rock
However, if I turn off the option Into parent level and choose the same menu command, I will get this structure in the Playlists branch:
- Test
- Rock
- Pink Floyd
- Dark Side of the Moon
- Wish You Were Here
- Pink Floyd
- Rock
If you have all playlist files stored in a single folder with the playlist levels represented in names of playlist files separated with the specified separator, then you should turn on the Split folder levels option as well. For example, the name of the "Rock - Pink Floyd - Dark Side of the Moon.m3u" playlist file could be parsed using " - " separator to "Rock" playlist with "Pink Floyd" sub-playlist and "Dark Side of the Moon" sub-sub-playlist.
If you have moved all media files from one location to another, so that their references in playlist files are incorrect, then you could try Replace - Paths in playlist files option in the Options dialog box. For example, if your old paths have this base folder:
c:\My Music\
and you have moved files to the next base folder:
f:\Music\
then you should specify these two paths in the Replace: and With: text boxes correspondingly. If the files physically exist at the newly specified location, then their tags will be entered correctly to the Library after import; otherwise, you could get the empty records with the Path information only, unless the Library already contains the matching files, which depends on the AddFileIfIsntInDBMode key in the Ini file. Although the option is called Replace - Paths in playlist files, the referenced paths are not directly replaced in the playlist files themselves, but they are replaced virtually in the memory instead, to be able to find the moved referenced media files when importing those playlists.
Of course, this add-on is not limited only on import of playlist files. It allows import of any nodes from the Media Tree, in which case you should use the option Import Child Nodes to Playlists instead. For example, you could use it to create playlist(s) based on the node selected in My Computer branch which contain media files that you want to add to Library. Or you could use it to create playlist(s) based on the selected Magic node (although the Magic Nodes add-on allows such thing by itself). Or you could select Artist node in Music collection and choose it to import all artists (with their sub-nodes) into the Playlist branch...
There are some new keys in the [ExportM3UsForChildNodes] section of the MediaMonkey.ini file for some less used options that are not represented with the GUI of the enhanced version of the add-on:
The keys that was in use with the older Export/Create Playlists version of the add-on are still effective:
-- AllNodesMode = 0 - "All" nodes are exported instead of their parents, i.e. the playlist files would contain paths to files in corresponding nodes and all their sub-nodes (the default behavior of the add-on versions before v4.0);
-- AllNodesMode = 1 - "All" nodes are exported with parent node names, the result could be very similar to the previous mode;
-- AllNodesMode = 2 - "All" nodes are exported with "[All]" playlist names, should be avoided with To parent folder option;
-- AllNodesMode = 3 - "All" nodes are exported as "Parent_Name [All]" playlist names (default mode);
The MediaMonkey.ini file is stored in the c:\Documents and Settings\User_Name\Application Data\MediaMonkey\ folder for MM4 and Win7. You could find the location of the .ini file depending of the version of MediaMonkey and Windows here. If you want to modify any key in it using e.g. Notepad, you should do that with closed MediaMonkey application.
To be able to use many commands of this add-on, you need to have the Media Tree displayed (set in the View menu). Additionally, if you want to use Export M3U Playlists * commands, you need to have the My Computer branch visible (set in the Manage Collections dialog box) and you should have turned on the option Show M3U playlists in My Computer nodes on the Library / Appearance page of the Options dialog box from the Tools menu.
You should not change the nodes in the Media Tree while the add-in is running! In fact, it is highly recommended that you do not use the program until the add-on finishes its work. If it takes to long and you want to abort it, you could choose the Terminate option from the context menu of the progress bar.
This version of the add-on has the same limitations as the older Export/Create Playlists version:
Exported playlists from the Playlists branch are all saved as playlist files with fixed content, even auto-playlists. If you import such playlist files on another computer you will get only static playlists, even with files that was exported from auto-playlists. So, this add-on cannot be used to transfer auto-playlists from one computer to another in their native form. If you want such possibility, you could use the Restore/Synchronize Database add-on instead, but it allows export/import only for the whole Playlists branch, while this add-on could export/import just the selected playlist and its sub-playlists.
Windows has the limitation on the path length of 260 characters; the files with longer path will not be created/copied on export, which applies both to playlist and media files (if you use any "... Copy Media Files" command from the menu). If you want to find out if any file is skipped on export, you could install the Event Logger add-on with the added EventLoggerMode key to the Ini file as it is mentioned in the Additional INI keys section.
When you open the sub-menu of any Import command for the first time, if it contains too many menu items, it could be truncated on the bottom of the screen. To get the same sub-menu with all items displayed correctly, you need to collapse/hide that sub-menu and open it again.
You could directly select a playlist for automatic export in the From combo box in the Options dialog box only for playlists on the first level, i.e. a playlist which is a child of the Playlists node. If you want to auto-export a nested playlist, you could do that if you manually enter a full path to that playlist using "\" as a separator between nested levels, e.g. Genres\Rock\Pink Floyd. This also means that you cannot use the "\" character in the playlist names specified in that combo box. However, this limitation has only the playlist specified in the From path for the automatic export - other exported playlists has not that limitation, even the child playlists of that playlist could have "\" in their names. It is even possible to specify the name of some nested playlist without its full path, but only if that name is unique.
Refreshing of the tracklist works very strange in MediaMonkey 2.x and because of that you need to click on the confirmation dialog after every generated playlist, i.e. for every sub-node. This confirmation dialog is not needed with MM 3.x and higher, and the speed and reliability are much better if you have installed MM 3.1.0.1218 or newer. Nodes within the Playlist branch don't have such limitation, only regular nodes. Also, almost all sub-nodes of the Library node [MM2-3] and collections (Entire Library, Music, ...) [MM4] are exported using SQL without the mentioned limitation.
If you use When any playlist is added or modified option, there are some situations when the automatic export doesn't work always when playlists are renamed or moved, even with MM v4.1.0.1648 or higher, but only after their parent node is collapsed/expanded. However, the automatic export is working always correctly using the mentioned option when MM playlists are added or modified.
This add-on is a false positive reported as a worm by F-Secure. The author of F-Secure promised me that will update its database and put the add-on on the white-list, but still didn't. If you go to the www.virustotal.com/en/ site, you will see that the add-on is safe tested by 54 popular anti-virus engines; the only one reporting a worm in it is F-Secure. By the way, the F-Secure was constantly having the largest number of false positives in last few years according to the Real-World Protection Test by AV-Comparatives.
If you are interested about my other add-ons for MediaMonkey, you could visit the following page.